To start, we put together a simple show where we use a few features of ProShow Producer. You will immediately notice that much can a simple way.
A New slide show
Create a new show titled “Show 1_Bearhug”. We do this by clicking on the menu bar button [File].In the pulldown menu, select New show. This opens a popup menu, New Slide Show. By default, this option creates a Blank Show. This is what we want.
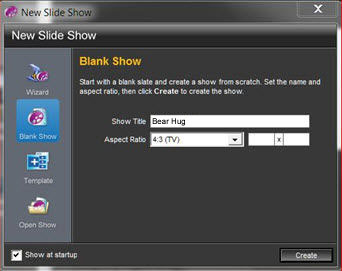
Here we have 2 options.
Option 1, is where we give the show a title, so enter “Show Title” Phew 1_Berenknuffel;
Option 2 is the aspect ratio. This determines the screen size.
In the pulldown menu, you get 3 options:
- the classical picture (4:3 TV)
- The widescreen (16:9 White Screen)
- an arbitrary image size (custom), where you can specify your own ratio.
For now we select 4:3 (TV).
Click on the “Create” button.
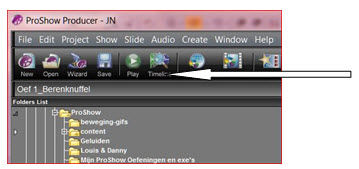
You will see that over the explorer (Folder list), this title is displayed.
Filling the slide list
Now we can start with the introduction of our material on the slide list below the screen. We will use the built-in browser. With this we use the Microsoft Explorer to sort through the folder list and select the correct folder where our working material is. When you select your folder you will see that its contents are displayed in the window under the “Folder List” and that the first image of the list is displayed in the preview window.
Options for dragging photos to the Slide list
To transfer images to the Slide list we have a few options:
- frame by frame You can click and drag frames one by one to the storyboard.
- multiple contiguous images (Shift key), Select the first picture, press the Shift key and then select the last picture of your sequence. Then drag the selection, with left button pressed, to the slide list.
- multiple images randomly selected (Ctrl key); Select the first picture, press the Control key and select the photos from the folder. Drag this selection, with left button pressed, to the slide list.
A few Important points:
- If you have a photo to the band brings movie will automatically be added to a transition. The duration of the slide and get the default transition time.
- The images that are being used in the slideshow are shown with a green checkmark in the browser. Thus you can easily recognize images that have already been used.
- When you drag multiple photos, they are placed in alphanumeric order in the timeline.
- It is best not to move or rename the folders in which your material is stored. When you close and reopen the program, you may not be able to find them again. And then there are special actions necessary to correct it.
- Therefore, the use of material on a stick is less suitable.
Slide Show preview
We have a sample videotape shown below.
In this videotape, you can see the slides with their transitions.
There is also a pointer that indicates your location in the show and this is also displayed in the preview window.
Deleting a slide from the slide list is done by selecting it and then pressing [Delete].
Moving a slide is easy. Select the slide and drag it to the new location.
We make our slide list empty and we select all images (with the Shift key) from Lesson 01, i.e, Bear Hug (1) tm (15). We drag them to the slide list.
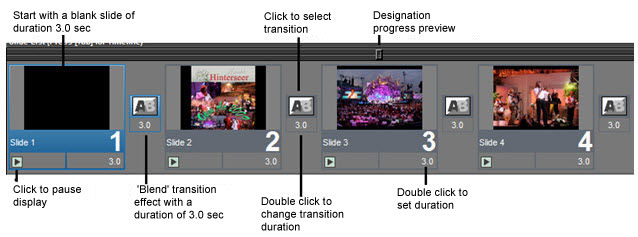
Each slide in ProShow has a default transition added after it.
Adjusting Transitions
How can we transition from one slide to another?
- Click on the transition icon in the slide list next to the added slide and the following screen appears
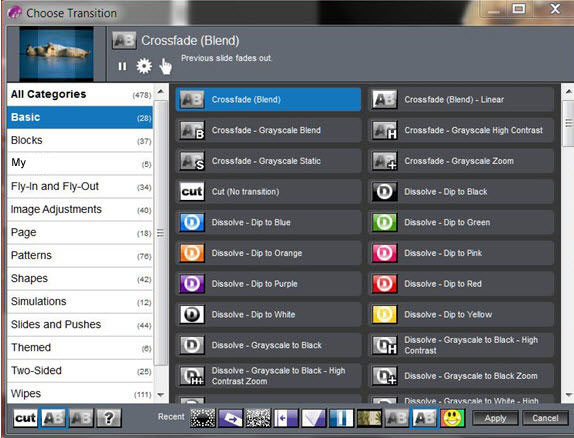
In the left column you can select a category and the transitions that are in this category are displayed on the right.
Select a certain transition and you can view its preview at the top left corner of the “Choose Transition” dialog. This way you can first try out the different transitions. If you have decided what you want, click on [Apply].
There are, however, some special features:
– [CUT]: this selection boils down to “no transition” being used.
– []: This means that you allow the program to select which transition is to be used. ProShow selects transitions, but at every turn, they work differently. You never know what the next transition will be. Only when you create the finished product will the currently selected transitions be, processed and preserved.
There are several choice options for transitions to change:
- Slide by slide: You select a slide and then click on the transition. This opens up the selection screen with all transitions.
- Multiple slides consecutively (Shift key): you select a slide, hold the shift key and select the last slide of the row and then click on a transition and then choose from the popup menu, a different transition. All transitions of this row will also change.
- Multiple slides randomly chosen (Ctrl key) and you select a slide, hold down the control key and select the next slide and another etc… This should not follow each other. Click on a transition and from the popup menu choose another transition. The selected slides will this transition.
- All simultaneously (Ctrl + A): Put the cursor in the slide list and press Control + A. To select all slides. Click on a transition and from the popup menu choose another transition. All slides have this transition.
- Randomize > Randomize Transitions: select slides, one, more contiguous, any or all slides. Right click on a slide and in the popup menu, click Randomize. From the drop popup menu click Randomize Transitions. ProShow chooses random transitions. The difference with [?] Is that they also be chosen at random but they are at the closing and reopening of the show has not changed.
Adding Text
We now insert text before and after the show. Right-click the first slide and from the popup menu select Insert. From the drop-down menu, choose Title Slide. This opens a window “Slide Options” tab “Captions”. Using the hotkey (Alt + T) you get the same. Type in the text field “Bear Hug”. To exit this screen click on [OK]. Now we point the mouse behind the last slide, right click and choose Insert> Title Slide. In the open window we type in the text field “End”. Click [OK] to exit this screen
Music introduction
In order to complete this show, we still music. This is also simple. Select from Phew mp3 01 the “Bear Hug” and drag it to the movie but in the band Soundtrack.
Saving the Show
Now we save this show. On the menu bar, select [File] and in the pulldown menu, select Save As. Select the appropriate folder on your hard disk using the explorer, in which you want to store this project. Change the File Name to “Show 1_Bearhug” and click [Save]. The project is ssaved under the extension .psh. It is now possible to retrieve the project at a later time and then possibly make further changes.
TIP: You should not wait to save a project till it is completely finished. It is much safer to do so as soon as possible to save time and major interim changes.
Creating a Movie
The only thing remaining is to create a movie. We create a simple end-product, resulting in a “EXE” file.
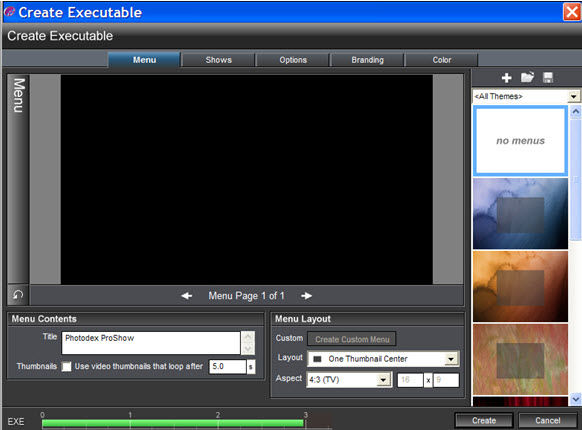
Just click on [Create Output] on the toolbar at the top. In the window that appears, select [PC Executable]. In the popup menu you have the “Menu” tab and the “no menus” theme which are selected.
Click on [Create] and place the show in the correct folder on your PC and give it the proper name “Lesson1_Bearhug” and then click [Save]. The movie will be created. Then you’re asked whether you want to see this, and if you click [Yes] you can view the result.


