The task here is to combine multiple shows on one DVD, or create an EXE file. In Lesson 7, we showed you how to do that. We now conbine 2 shows in 1 EXE file.
First we focus on customizing the start menu. ProShow gives you the ability to personalize this menu. In other words, you can change the background, buttons, text, button positions, etc… to suit your requirements.
Opening a Show
- Open a show that has already been created (in psh format). You can do this by clicking on the File button and then selecting “Open” or “Open Recent” the drop down menu.
In “Open”, use the Explorer to open to the appropriate folder and then select the show to load it.
In “Open Recent”, select the show from the displayed list.
NOTE: No .EXE format shows can be combined in ProShow
- Important Note: An EXE format show cannot be opened in ProShow Producer.
For combining shows, they should always be in .psh format.
Creating an EXE file
- Now, we will create an EXE file.
Click [Create Output] the button in the toolbar and in the window that opens, select [PC Executable]. This opens the [Create Executable] window.
Tabs in the [Create Executable] window
- The [Create Executable] window has several tabs: [Menu], [Shows], [Options], [Branding] and [Color].
[Menu] Tab
Theme
- In the [Menu] tab, we select the right [Theme].
Everything is OK as long as you don’t select [no menus] because then the show will not have a menu.
Menu Contents
- In the Menu Contents section, we enter the title in the [Title] box. This title is valid for the entire show. [Thumbnails] indicate that you can have a preview of a particular effect that, i.e, before you click a button, the effects that are linked to the buttons are displayed in miniature. You can even specify the length of the preview.
Menu Layout
In the Menu Layout section, you have the following fields:
- Custom: With the [Create Custom Menu] button you can create your own menu. We will discuss this a little later.
- Layout: With this option, you can select the number of buttons that should be on your page. For this lesson, we select [Three Thumbnails Left] (3 buttons on the left).
- Aspect: Here we specify [4:3 (TV)] as the aspect ratio.
Shows Tab
Adding additional shows
- Consider the “Shows” tab. Using this we can add other shows. To do so click on the [+] sign on the left and a dialog box opens, which you can ignore and just click on [Create Project].
This gives you the folder list and you can select the appropriate folder and open the additional show.
You will see this show in the list on the left of the window. Note that each show will be numbered and you can see this on the right. This number is also the ranking of a layer. The number of shows that can be added is limited only by the memory of your device (PC, CD, DVD, etc. ..). The maximum number of shows is 99. Always have an intro show and have a maximum of 95 shows.
Also, in the ProShow window itself you see below that the toolbar for is different. The [+] sign is present to open a show.
Point to remember: The [-] option removes a selected character. The arrows display the sequence, which can be customized.
Changing the Titles of shows
- We check whether the names of the shows are correct. If not, you can select a show (select the appropriate layer) and using the [Set Menu Title] change the title.
Menu thumbnails:
- You can also change the image for the thumbnails. Click on the [Set Menu Thumbnail] button. This displays a new window where you can decide which photos are to be displayed as thumbnails.
Advertising a movie
- [Include Intro Show] hasn’t been selected. If you do so, a small show precedes your own show. ProShow Standard has its own introductory show available. A short intro show is a show that plays before your show or your start menu.
This is usually the companies’ logos.
But using the [Select Show] option you can use your own show.
Options, Branding, and Color Tabs:
- In the Options, Branding, and Color tabs, we use the default settings.
Other formats with multiple buttons
In addition to the DVD format, there are several other EXE formats that you can use while combining shows in the same manner as described here.
These formats can be: Blu-Ray, Flash, Web Show and Autorun.
Creating a Custom Menu
Largely, the creation of a custom menu is similar to creating a slide.
Combine layers, text and music together to create a composition that will impress your audience. As we have seen in this lesson, you can create a home page with a background, text and buttons.
The home page can be changed according to what we want.
We do this by using the [Create Custom Menu] button in the [Menu] tab.
This displays the following window.
This contains various tabs: [General] (General), [Thumbnails] (thumbnails or buttons) [Layers] (layers), [Captions] (Text)
These tabs are discussed next.
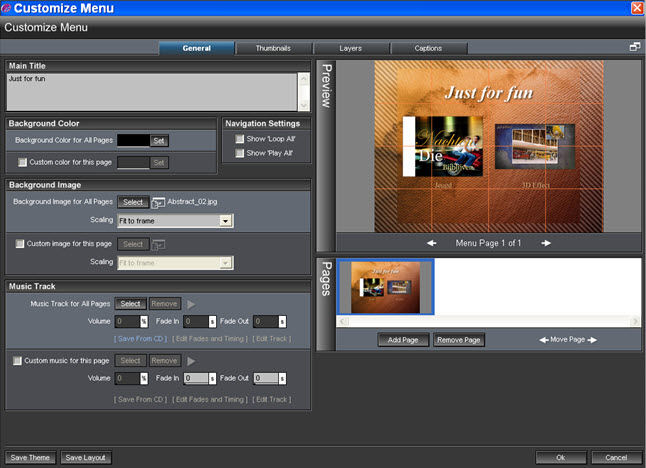
General (general)
The most important sections are:
- Main Title (Main Title): In this box you can see the main title of your DVD or EXE and you can customize it here.
- Background Color (background color): Allows you to select a color for the background with the color wheel. It allows you to select a background for all pages or one for each page.
- Background Image (background image): Using the [Select] button you can use a photo as a wallpaper and you also have the [Scaling] (Scale) drop-down menu where you can select the mode. Here also you have the option of using the same setting for all pages or using a different format for each page.
- Music Track (music track); Again, you can select the music which is to be used for all pages or for each page individually. Using the [Select] button, you can attach a piece of music to the page. While the page is displayed on a TV or PC then one hears this music and it is repeated if necessary. Click on one of the buttons to play a show and this track is played for the entire duration of the show and when the show is over, this music still plays. The music can be trimmed from here. Eg. You can use the [Volume], [Fade in] and [Fade out] options to do this. Even [Save from CD] and [Edit Fades and Timing] options are available.
- Navigation Settings:
- Show “Loop All”: This checkbox allows you to play the show repeatedly.
- Show “Play all”: This checkbox will ensure that all shows are played successively.
- Pages (Pages): One can add, delete or move pages. It is true that in ProShow, the application itself adds or deletes pages depending on the setting of the Layout, if necessary.
Thumbnails (Buttons)
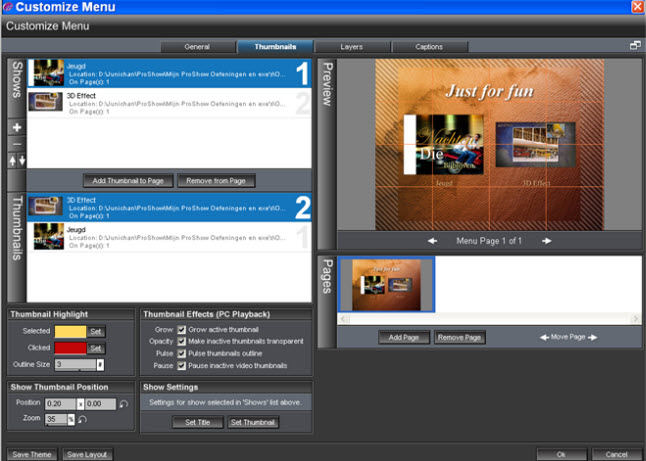
- Shows: Here you have the list of shows that are open and you have the option of adding, deleting or moving a show.
- Thumbnails (thumbnails or Buttons): This field indicates the list of buttons. One can also add or remove “Thumbnails”.
- Thumbnail Highlight: Allows you to determine the color and thickness of the border around the thumbnail. This effect, is effective only when you have a DVD or EXE file and play it using your remote or by clicking on the thumbnail.
- Show Thumbnail Position: Here you will find the “Position” (position) and the “Zoom” levels of the thumbnails.
- Thumbnail Effects (PC Playback): Here are some checkboxes that you can de-select but we stick to the standard settings, where everything is selected.
- Show Settings: In this section, you can set the title of a show with [Set Title] button and if required, modify the contents of a thumbnail with the [Set Thumbnail] button. These buttons are also present under [Create Executable]- [Shows].
Layers (Layers)
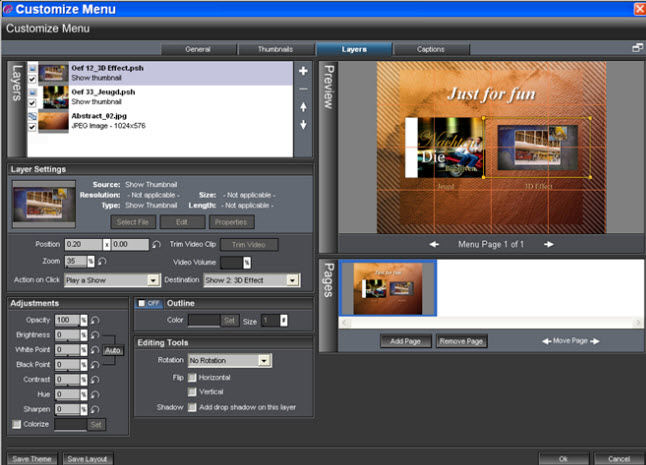
- Layers (Layers): This section displays the different layers. The selected layer is highlighted and the others are displayed along with their details. Note that the background is also treated as a layer.
- Layer Settings (Layers occupancy): This section contains the following:
- [Position]: the location of the thumbnail.
- [Zoom]: the zoom factor.
- [Action on Click]: This determines what action will occur if you click the thumbnail.
- [Destination]: This is related to [Action on Click]. You can determine what occurs when the [Action on Click] button is clicked.
If you use a video instead of a picture you will find buttons that you can use to trim the video. This video trimming function is not required for an ordinary slide. Thus, depending on the slide, some of the buttons may or may not be available.
- Adjustments (Adjustments): This section displays a series of options that you can use to customize the image that you are using as your Thumbnail. These options have already been discussed while dealing with slides.
- Outline (Framework): With this option, you can have a border around the thumbnail in a particular color and you can also set the thickness. Here you can see that this is quite thick.
- Editing Tools (tools): This allows you to rotate the thumbnail, flip it horizontally or vertically, and have a small shadow for it, which is very light.
Captions (Text)
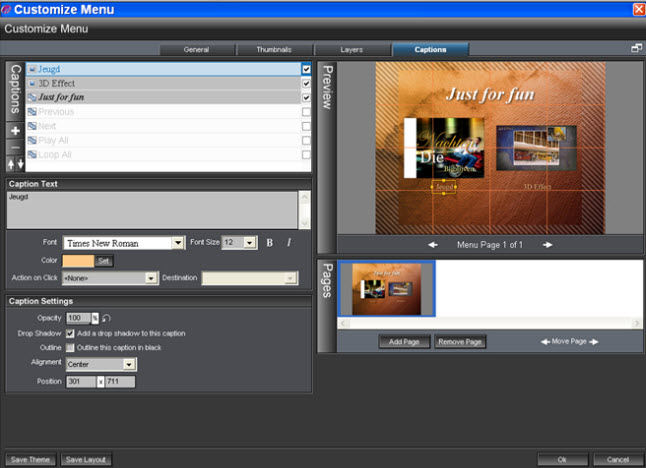
Captions (Text): This text box displays the text on the different layers. You can make each layer active by adjusting the text to your liking.
You can add or delete text (+ or -). You can also move the text with the arrow buttons.
Caption Text (titles): As with other screens where you can edit text, you have the [Font] (font), [Font Size] (size), and the [Color] (color) to choose from.
[Click on Action] and [Destination] are also available and adaptable for some texts.
Caption Settings : This contains a few options to customize the text
- [Opacity]: controls the brightness
- [Drop Shadow]: places a light shadow on the text
- [Outline]: places a light border around the text
- [Aligment]: here you have some alignment options
- [Position]: specifies the location of the text
Creating an .EXE file
- This leaves only the creation of an .EXE file. Click the [Create] button at the bottom of the screen and select the correct folder where you want to save the file and give it the correct name.


