This is an example where ProShow is used to create a Christmas card with plenty of effects and custom music.
New show
- Create a new show titled “Show 34_ChristmasCard”. The aspect ratio is set at 4:3. Click [Create].
Photo
- Use the explorer to open Lesson 34; and drag the photo from the directory, [Christmas Pictures], which is the “ChristmasPhoto_f (5)” to the slide list.
Adjusting the duration
- Set the duration of the slide to 15 sec.
- The background of this slide, is set to black.
Selecting a Transition
- If we have to select a transition, we select, [Crossfade (Blend) – linear].
Placing and Enlarging the photo
- We place the picture at right place. Double-click the slide and set the following options in the [Layers]> [Layer Settings] tab:
[Position] = 0 x 15,
[Zoom] = 75%
and click [OK] to close this window.
Additional layers with gifs
- Now we add flickering lights to the top and bottom of the Christmas photo. From the [Gifs] file, drag the photo, “stars”, as an additional layer to our Christmas photo (use the [Ctrl] key while dragging).
Double-click the slide and set the following options in [Layer]> [Layer Settings]:
[Position] = 0 x 34,
[Zoom] = 75%.
Duplicate this layer. To do this, right click the layer and select [Duplicate Layer] and set the following options:
[Position] = 0 x -5,
[Zoom] = 75%
and click [OK] to close it.
- Now let’s add horizontal and vertical red lines around this Christmas photo slide show as it moves from one slide to another.
From the [Gifs] file, drag the photo, “horizontal-line 5” as an additional layer to our Christmas photo (use the [Ctrl] key while dragging).
Double-click the slide and set the following options in [Layer]> [Layer Settings].
[Zoom] = 50%.
For the motion effects, use the following data in [Effects]> [Motion Effects]:
[Starting Position], [Pan] = 80 x -10,
[Ending Position], [Pan] = -20 x -10.
Duplicate this layer, “horizontal-line 5” and specify the options as follows:
[Zoom] = 50% (as it should be according to me).
For the motion effects, set the following options in [Effects]> [Motion Effects]:
[Starting Position], [Pan] = -80 x 38
[Ending Position], [Pan] = 20 x 38
and click [OK] to close it.
From the [Gifs] file, drag the picture, “Vertical-Line 4” as an additional layer to our Christmas photo (use the [Ctrl] key while dragging).
Double-click the slide and adjust the following options in [Layers]> [Layer Settings]
[Zoom] = 30%.
For the motion effects, set the following options in [Effects]> [Motion Effects]:
[Starting Position], [Pan] = -40 x 70,
[Ending Position], [Pan] = -40 x 0.
Duplicate this layer “Vertical-Line 4” and specify the options as follows:
[Zoom] = 30% (as it should be vertical).
For the motion effects, set the following options in [Effects]> [Motion Effects]
[Starting Position], [Pan] = 40 x -70,
[Ending Position], [Pan] = 40 x 28
and click [OK] to close it.
Text Layers insertion
- Now we insert text on this slide.
Double-click the slide and select [Captions]> [Caption Settings].
We enter the text, “Warm greetings”, in the text box.
We use the following settings:
[Font] = Amonte Snow,
[Size] = 20,
[Color] = red,
[Outline]: selected and the chosen color is white,
[Drop shadow]: selected and the color chosen in this case also is white,
[Fly in] = Elastic left,
[Normal] = None,
[Fly out] = Shrink out,
[Align] = center,
[Position] = 50 x 10
[Skew] = 25,
[Character spacing] = 135.
Duplicate this text layer by right clicking and selecting [Duplicate Caption].
Change the text to “Blessed Cherry Festival” in the text box.
We now change only the following options:
[Fly in] = elastic right
[Position] = 50 x 25
Click [OK] to close.
Text Movement
- To make the text arrive more slowly we could do as follows:
Double-click the slide.
Select [Captions]> [Caption Motion].
Select the first text layer and slide the [fly in] bar to 10sec.
Do the same for the 2nd text.
Click [OK] to exit this screen.
Additional layer
- Now we still have to add snow.
Drag the picture “Snow-2” from the directory [Gifs] as a layer in our slide.
Double-click the slide and select [Layers]> [Layer Settings] and set the [Scaling] to “fill frame”. Click [OK] to close it.
Dragging, zooming and placing Photos
- Its time to start working on the 2nd slide. On the 2nd slide, we keep the same background and transition as the 1st slide, dragging the “ChristmasPhoto_f (10)” from the [Christmas Pictures] to slide 2. This picture has to be placed in the correct position.
[Position] = -24 x 0,
[Zoom] = 50.
Click [OK] to close it.
Adjusting the duration
- The slide time is set at 10 sec instead of 15 sec.
- The slide time is set at 10 sec instead of 15 sec.
- Furthermore, we drag 2 gifs in particular from the directory [Gifs]: “Candlelights1” and “Candlelights2” as layers on slide 2.
This is now placed correctly.
Candlelights1: [Position] = 12 x -35, [Zoom] = 20.
Candlelights2: [Position] = 33 x -35, [Zoom] = 20.
We create a duplicate of these 2 gifs and then move them.
Right-click a layer and select [Duplicate Layer] which also needs to be placed correctly.
Candlelights1 (duplicate): [Position] = 12 x -14, [Zoom] = 20.
Candlelights2 (duplicate): [Position] = 33 x -14, [Zoom] = 20.
Click [OK].
Text insertion
Text may also be inserted again.
Double-click the slide and select [Captions]> [Caption Settings]. We enter the following text in the box.:
“Nicole and Julien.”
We have the same text settings that was used in the 1st slide except for the position, the space between the letters and the space between the lines:
[Position] = 72 x 72
[Character spacing] = 215,
[Line spacing] = 155.
We also increase the [Fly in] time so that the text comes in slowly.
We select [Captions]> [Caption Motion] and drag the [Fly in] slider to 10 sec.
Click OK.
Additional layers
- In order to add some cheer, we add a star.
Drag the the “Fire Star” from the folder [Gifs] as a layer on slide 2.
Double-click the slide and select [Layers]> [Layer Settings]. We place the star in its correct place: [Position] = -32 x -39, [Zoom] = 50.
Now we need to set the effects for this.
Select [Effects]> [Adjustment effects] and for the [Starting Position], we set the [Opacity] to 0.
Click [OK].
- As the first slide we are also going to add snow to it.
Drag the “Snow-2” photo from the directory [Gifs] as a layer in our slide.
Double-click the slide and select [Layer]> [Layer Settings] and set the [Scaling] to “Fill frame”.
Click [OK].
Adding Music
- Of course, without music a card is incomplete. Drag the wav file “We wish you a Merry Christmas” from the directory [Music and Sound] to the soundtrack. Now we trim the music to only the portion of this track that is appropriate to use for our card. Double click on the music in the soundtrack and in [Show Options]> [Music] click on the button at the bottom which is [Edit Fades and Timing]. This opens a new window and here we specify the following settings.
[Start] = 19.000,
[Fade in] = 3.000,
[End] = 62.000,
[Fade out] = 3.000.
Click [OK] to exit this window and then click [OK] to exit this operation.
Blank slide as the Introductory slide
- To bring in a little more of the Christmas spirit, we import the sound of a magic wand to each slide. Double-click the blank slide and select [Sounds]> [Sound Effects]. Click [Select Sound], and then [Select Sound file] and using the explorer select the folder, [Music and Sound] and the .wav file, “Wand”.
Drag this track to the slide itself and not to the “Soundtrack”. Click [OK].
- This is repeated on the 1st slide.
Select [Sounds]> [Sound Effects].
Click the [Select Sound] button, select [Select Sound file] and select the [Music and Sound] folder using the explorer and then select the .wav file, “Wand”. Click [OK].
Dragging a Soundtrack
- Now, this sound starts at the beginning of the slide, but we want to this to start at the end of this slide, and at the beginning of the transition. Click on [Timeline] so that the music is displayed better on the Soundtrack. Now you can simply select and drag the sound to the desired location. Thus, the Christmas card is complete.
Saving the show
- Save the project under the name, “Show 34_ChristmasCard”. Select [File]> [Save as] and use the explorer to place this show in the correct folder.
Creating an MPG2 file
- Create a MPG2 called “Christmas Card”. Click the [Create] button, and select [Video File].
Use the following settings:
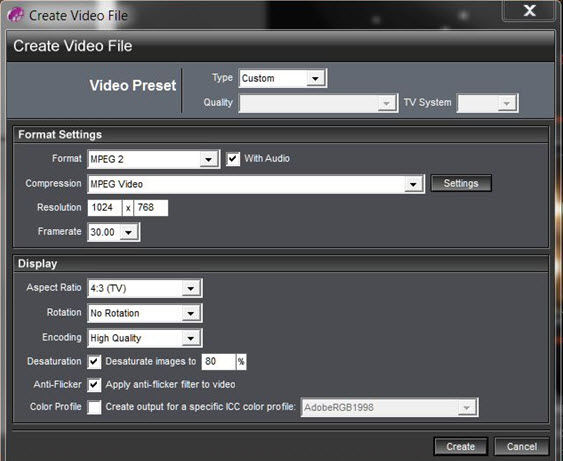
Click on [Create] ‘and this show will be converted into a movie. Again, place your show in the correct folder with the help of the explorer in order to convert it to the desired file format.


