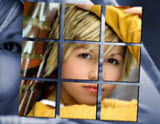
We use a grid as a mask to add a number of visual effects to photos.Its best if you use this sort of mask at the beginning or end of a show.
Here are a few simple examples.
New show
- Create a new show titled “Show 43_PhotoGrid”. Click [File]> [New Show] change the [Show Title], and retain the [Aspect Ratio] at 4:3. Click [Create].
1st example
Photos as layers
- Select the “Grid” and the “Baby In a Tub”. Drag them to the slide list as layers.
Adjusting the Slide duration
- We set the duration of the slide to 8 sec.
Organizing Layers
- Double-click the slide and select [Layers]> [Layer Settings].
Notice that the layer sequence is: [Grid] followed by [Baby In a Tub].
Mask
- The [Grid] is our mask layer. Select it and select the [Masking Layer] checkbox. Since this is a PNG extension ProShow will recognize this as normal and the [Mask type] selected will be [Alpha (Transparency)]. If not, correct it. This type of mask can be compared with a real mask. You cut some parts out and therefore you see what is under it.
Zooming layers
- Now we move everything up so that the Baby moves and the effect is complete. Under [Layers]> [Layer Settings], set the [Zoom] of the [Grid] to 75%.
Moving and positioning layers
- Select [Effects]> [Motion Effects]. Select [Baby in a Tub] and set the [Rotate] (rotation) from 0 to 23,
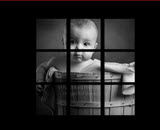 slide the [Zoom] up from 100% to 145% and [Pan] from 0 x -2 to 22 x 0.
 - Click [OK] and close this window to exit.
2nd example
Photos as layers
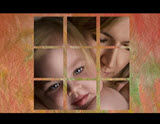
- Select “Grid” and “Mother & Child”from Lesson 43. Drag them to the 2nd slide as layers.
Adjusting the Slide duration
- The duration of the slide is set to 8 sec.
Organizing Layers
- Double-click the slide and select [Layers]> [Layer Settings].
Place the layers as follows: [Grid] followed by [Mother & Child]. Correct this if necessary.
Mask
- The [Grid] is our mask. Select this layer and select the [Masking Layer] checkbox. The [Mask type] is set to [Alpha (Transparency)]. If this hasn’t been selected, select it.
Zooming, moving and positioning Layers
- Now we specify the settings so that we have a movement. Under [Layers]> [Layer Settings] set the [Zoom] to 75% for the [Grid] layer. Then select [Effects]> [Motion Effects]. Select [Mother & Child] and set slide the [Zoom] down from 135% to 90% and set the [Pan] from -7 x -1 to -1 x 1. Place the photo so that the eyes come just behind the grille. Click [OK] to close the window.
Adding an extra layer
- To improve the visual effect, we insert a layer to get more depth. Select “Background_04” from Lesson 43 and drag it on this slide as an extra layer.
Low background
- Double-click the slide and choose [Layers]> [Layer Settings] and move this layer under the other 2 layers.
 Click [OK] to see the result.
Third example
Now we combine 2 pictures in the mask and give them contrasting movements.
Photos as layers
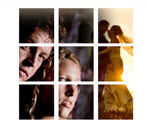
- Select the photos, “Grid”, “Couple” and “Dancing at Dusk”. Drag them to the 3rd slide as layers.
Adjusting the Slide duration
- The duration is set at 8 sec.
Customizing the Background
- First we change the background to white. Double-click the slide and select [Slide]> [Background]. Select the [Background type]. We use a [solid color] and from the color wheel, we select [White].
Organizing Layers
- Select [Layers]> [Layer Settings] and set the layers as follows: [Grid], [Couple] and [Dancing at Dusk]. Correct this if necessary.
Mask
- The [Grid] is our mask. Select this layer and select the [Masking Layer] checkbox. The [Mask type] will be set to [Alpha (Transparency)]. If this is not so, correct it.
- As you will see only the layer, [Couple] is linked to the mask. Now, we also want the other layer to be linked to the mask. This can be done by entering the number 2, in the [Depth Mask] field.
Zooming, moving and positioning Layers
- Now once again we specify all the settings so that we have contrasting movement. Under [Layers]> [Layer Settings] set the [Zoom] to 90% for the [Grid] layer. The [Couple] layer is just moved from the bottom to the top. Select [Effects]> [Motion Effects]. Select [Couple] and set the [Zoom] at 170% and set the [Pan] from -15 x -15 to 30 x 0. The layer, [Dancing at Dusk] gets a little more movement. Slide the [Zoom] down from 300 to 175 and set the [Pan] from 37 x 33 to -55 x -16. Click [OK].
Inserting a Vignette
- When you look at the preview you will see that the [Couple] which is an important part of the 2nd picture, is covered. That’s why create a [Vignette] shape for it. Double-click the slide and select [Layers]> [Editing]. Select [Vignette] and click on the [Vignette] button and set the [Vignette size] (size) to 60.
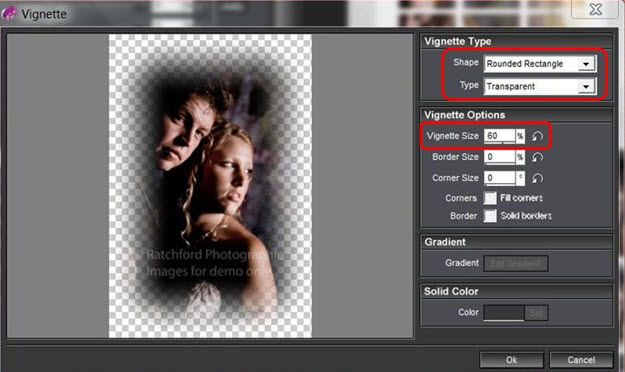
- Click [OK] a few times and see the result.
Fourth example
Now we will try to work with a moving mask and also use a shadow for a magnificent 3D effect.
Photos as layers
- Select the layers, “Grid” and “Girl”. Drag them to the 4th slide as layers.
Adjusting the Slide duration
- The duration of the slide is set to 8 sec.
Organizing Layers
- Double-click the slide. Select [Layers]> [Layer Settings] and place the layers as follows: [Grid] and [Girl]. Correct this if necessary.
Mask
- The [Grid] is our mask. Select this layer and select the [Masking Layer] checkbox. The [Mask type] selected is [Alpha (Transparency)]. If this is not the case, select it.
Zooming, moving and positioning Layers
- Now we specify the settings so that both the [Grid] and [Girl] can have motion effects. Under [Effects]> [Motion Effects] for the [Grid] layer, slide the [Zoom] down from 110% to 75%. We now rotate this layer a little. Set [Rotate] from 0 to 10 degrees. Select the layer, [Girl], and set the [Zoom] from 130% to 145% and [Pan] from 16 x 9 to 0 x 4.
Shadow insertion
- We now place a shadow on the grid. Instead of using [Drop Shadow], we are going to create one. Select [Layer]> [Layer Settings]. Select the [Grid] layer. Right click on this layer and select [Duplicate Layer]. Place this new layer at the bottom but we do not attach it to the mask. Now we have a copy with the same settings as the original. We only change the [Position] to 0.5 x 0.5. This small shift gives an impression of a shadow.
Extra layer as a background
- To make it complete we are also make a duplicate of the [Girl] layer. Select it and right click, and again select [Duplicate Layer]. This layer is placed at the bottom.
Coloring the Layer
- We will give this layer a different color for better contrast. In [Layers]> [Editing] we select the [Colorize] box and with the color wheel, we select a light blue color (RGB = 78/95/135).
Moving and zooming layers
- Then, under [Effects]> [Motion Effects], we specify the motion with the following settings: [Pan] from -55 x -9 to -42 x -7 and [Zoom] from 260% to 220%.
- Click [OK] and close the window to see the result
Saving a Show
- Save this project. Click [File]> [Save As] and select the correct folder using the explorer, in which you want to save this project and change the [Name] if necessary. Then click on [Save].


