Keyframes: What and why
If you are using this for the first time the title looks intimidating but when you realise that the basic operation is “something from nothing” you can go on to create great effects. [Keyframe] (Key Sound) is one of the strongest points in this application. This is also only available in ProShow Producer but not in ProShow Gold.
Before we begin, we look at the origin of [Keyframes]. Long ago, during the creation of a cartoon, one had to draw each image. A picture is called a [frame]. [Keyframes] were defined as the images where something important occurred.
Thereafter, all the images between the [keyframes] were drawn to achieve a smooth and flawless quality. This process is called [tweening] or (Inbetweening) .
Now, this is taken care of by Producer itself and it fills the missing frames.
How does this work in Producer: You determine the [Keyframes] and set them where there is some important occurrence and Producer adds the rest of the frames.
In our previous exercises, we have actually encountered and used [Keyframes]. Whenever we work with [Motion Effects] we have the [Starting position] and [Ending position]. This beginning and end are, in fact [keyframes].
In Producer multiple layers [keyframes] can put to use in a single slide. Also, there is no limit to the number of keyframes. This allows you to create very complex movements. We can now create effects which we had to spread across slides, previously.
[Keyframing] saves you time and increase your creative options. You can now have a number of composite effects. Now it is up to your own imagination to create a piece of film that you dreamed about.
Using the keyframe timeline.
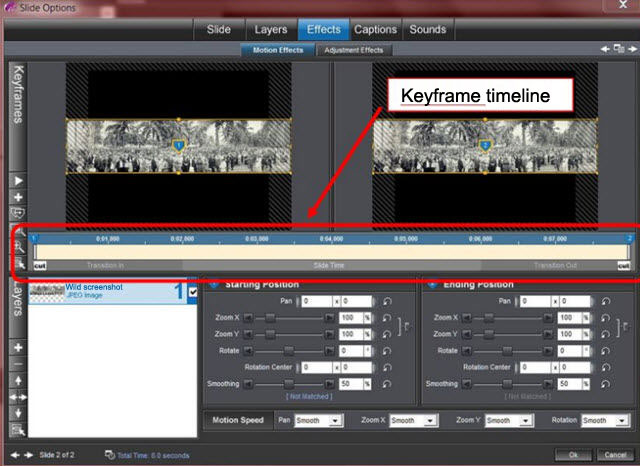
This [Keyframe Timeline] is found only under [Slide Option]> [Effects], under both [Motion Effects] as well as [Adjustment Effects]. To view them, either click the [Effects] button on the toolbar at the top,or double-click a slide tab and select [Effects].
Now we will go through this timeline in greater detail.
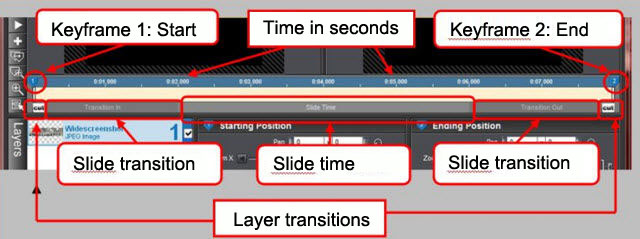
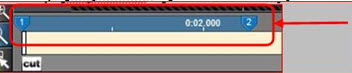
- At the top, you will see that we have 2 [Keyframes] No [1] and No [2]. These are always automatically placed by Producer, i.e, whenever you insert a layer. There will always be a beginning and an end [keyframe].
- The numbers you see in the blue bar at the top are the times in seconds. Remember that the total time also includes the transition times. The transition time is always divided into 2 slides. In this example, the transition time is 2 seconds, both at the beginning and at the end, and the slide duration is 4 sec.
- Below the timeline you see the [transitions], [Transition In] and [Transition Out], and the slide time [Slide Time]. There is a slight difference in the color. You have dark and light zones.
- [Cut] which is present at the beginning and the end of the time line, displays the transitions for the specific layer. In this drawing, there are no transitions. This is not to be confused with the transitions between slides. They can also be combined
Adding Keyframes
Now that you can read the time line we are going to Add keyframes.
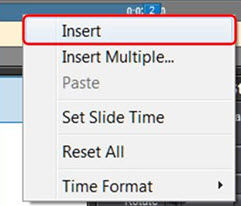
There are 3 options:
- Click the [+] icon on the left, which is [Add Keyframe]. Producer always places keyframes in the middle of the blue portion. If multiple parts are present, you can select a part by clicking it and then it turns blue. The other part is gray.
- Double-click in the timeline. With this method, you have to determine in advance where and when you want to place a [keyframe].
- Select a time where you want to place a [keyframe], and then right click and select [Insert] from the popup menu.
Removing a keyframe
The removal of a [keyframe] is done by using the mouse pointer to select a keyframe, and then right click and select [Delete]. Removing all [keyframes] is done by right clicking and selecting [Reset all].
Additional keyframe information
If you move your mouse pointer over a [keyfr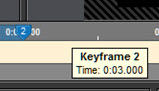 ame] you will get additional information. You can see what [keyframe] it is and its time.
Adjusting Keyframe time
The [keyframe] time can be easily customized. This can be done in 2 ways:
- Either select the [keyframe] and drag the left or right points until it is at the desired time.
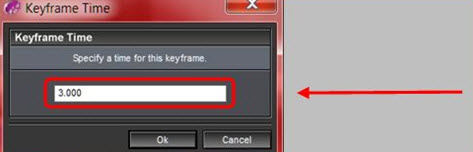
- Or, and this is very precise, right click and select [Set Time for this Keyframe].

In the next screen [Keyframe Time] enter the correct time and click [OK].
Adding transitions to layers
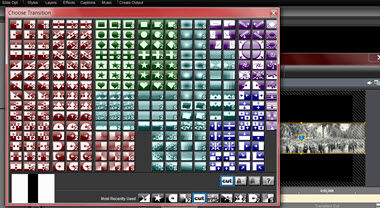
Transitions can only be added to a layer at the first and last [keyframes]. This is not possible with the [keyframes] in between.
To add a transition just click on it and a window opens, with a whole series of transitions to choose from.
The transition time can be increased or decreased. You can do this in the following ways
- dragging.

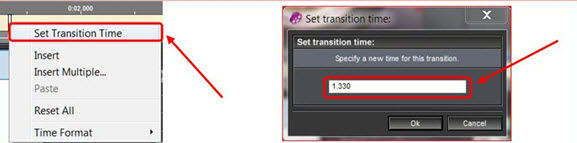
- by right clicking, selecting [Set Transition Time] and entering the exact time in the dialog that appears.
Viewing Interim results
Youcan view the interim result of your work in several ways.
- Click on the play button [Preview slide].

- Click and hold, on the [Slide Time] bar under the transition bar. Then you will see a red arrow which you can drag.

This method is actually the most practical because you can decide how, where and what happens during playback.
- And as already know, you can close this window and just click the the play button in the show itself.
Adjusting the Slide duration
One can always adjust the duration of a slide without changing the [keyframe]. ProShow increases or decreases the duration of the [keyframe] in proportion to the changes in the slide.
Adding time
Time can also be added or subtracted from a given [keyframe]. Right click on that [keyframe] and select [Add / Remove Time from Keyframe] and enter the extra time in the following dialog.
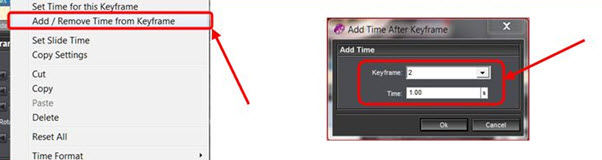
Bear in mind that you can never add or reduce the time of the last [keyframe].
An example
We will demostrate all this in an example. We will use 5 keyframes
New show
- Create a new show titled “Show 45_Keyframes”. Click [File]> [New Show] change the [Show Title], and retain the [Aspect Ratio] at 4:3. Click on [Create].
Photo for movie band
- Select the photo, “Wide Screenshot” from Lesson 45. Drag it to the slide list.
Changing the Slide duration without transitions
- We set the duration of the slide at 10 seconds and we do not add any transitions. We then set the time to 0.
Adding Keyframes
- Double-click the slide and select [Effects]> [Motion Effects] or click the [Effects] button on the toolbar.
- As you can see there are 2 [keyframes] visible on the timeline at the beginning and end. We will have to add 3 more. We do this by clicking the [+] icon, 3 times.
Positioning Keyframes
- These additional keyframes are placed precisely. Right click on [keyframe 4], select [Set Time for this Keyframe] and in the following dialog enter, 7.5 sec. For [Keyframe 3], we enter 5 sec and for [keyframe 2] we enter 2.5 sec. Thus, we have quantitatively divided the timeline in 4 parts.
Inserting motion effects
- We are now going to insert motion effects using these [keyframes]. Click [keyframe 1] or close to it
and you will see that the area between [keyframes] 1 and 2 is selected. The other areas are less pronounced in color. Under the timeline, you will see [Keyframe 1 (Starting position)] in box1 and [Keyframe 2] in box2.

For [Keyframe 1] set the [Pan] to 0 x -35, and for [Keyframe 2] place it below the first one by setting the [Pan] to 0 x 35.
- Now select the area between [keyframes] 2 and 3. Make the necessary changes in the boxes at the bottom.

[Keyframe 2] is left unchanged but in [keyframe 3], we place the picture back on the top, by setting the [Pan] to 0 x -35.
- Now we move to the next zone, having [keyframes] 3 and 4. [Keyframe 3] is left unchanged and in [keyframe 4] the photo is again placed at the bottom, by setting the [Pan] to 0 x 35.
- For the last zone, which contains [keyframes] 4 and 5, let [keyframe 4] remain as it is and in [keyframe 5], we place the picture exactly in the middle, setting the [Pan] to 0 x 0. Voila, that’s it for this lesson. Without the use of [keyframe] you would have had to work with various slides and you would have to create the necessary copies for the appropriate starting and ending conditions.
Saving the Show
- Save this project now. Click [File]> [Save As] and select the correct folder using the explorer, in which you want to save this project and change the [Name] if necessary. Then click on [Save].


