The “Report Wizard”
We use “Reports” to show results and / or further calculations in a query.
They are a more concise and certainly a printer-friendly way of displaying the data from our “Tables”/”Queries”.
“Reports” use the same fields in “Design View” as “Forms”, but usually to make use of “Queries” as a base, instead of “Tables”.
The simplest form for creating “Reports” is the “Report Wizard”.
You can start the “Report Wizard” by selecting “Reports” objects in the window and clicking “New”.
In the dialog that appears, choose “Report Wizard”.
In the drop-down menu below, choose a query as the basis for your report and click OK.
This opens the “Report Wizard” that will lead us through a step by step process.
You answer the questions in each window and click “Next”.
Once all the windows are completed, click “Finish”.
At last!, you’ve created your first report.
The use of “Auto Report”
Similar to the “Forms” this is the quickest and simplest way to create “Reports”.
To make an “Auto Report”, select “Reports” in the “Objects window”, click “New”, and select the “Auto Report”.
Then select the query (or table) that you want to use in “Auto Report” from the dropdown menu.
If you click OK, you will automatically access a simple report that you can use to show the data that you have selected.
The style of reports it makes is not much in itself, but ease and simplicity of implementation makes a lot of difference.
To Create Report in “Design View”
We can design and modify reports in “Design View”.
To open the “Design View” window for “Reports”, we only need select “Reports” and then click on the “Design” button.![]() .
.
As in our Form “Design View”, the Report “Design View” has the characteristic choices for font size, font color, background color etc. of our objects.
Each time you – want to see how your report will look when you print it, click on the “Print Preview” button.
Of course, we can also create our report in “Design View”, select “Reports” in the “Objects window”, and click “New”.
Select “Design View” from the list, and use the dropdown menu of the query or table to choose our report.
click OK.
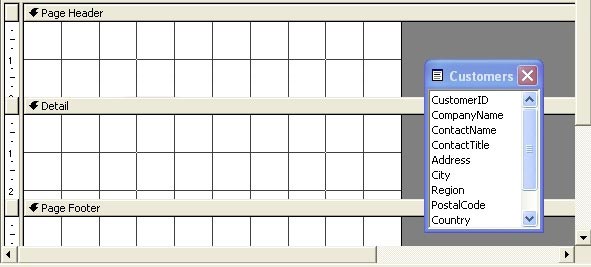
The first thing that strikes us is that we now, as opposed to a form, have three sections.
“Page Header”, “Detail” and “Page Footer”.
Where you place the fields in your report, these can be very important for displaying the report.
- Fields that are towed to the Detail section of our report are shown once for each record from our associated data source.
- Fields that are towed to the Page Header or Page Footer-section be repeated once on each page.
This makes the later sections suitable for “Labels” and date / time but not for calculations.
Placing fields from our query or table in our report is done in the same way as in our forms. (Select and drag)
We can add two sections to our report, “Report Header” and “Report Footer”
Click on “View” from the menu bar and select “Report Header / Footer”.
Fields in these sections are shown only once per report.
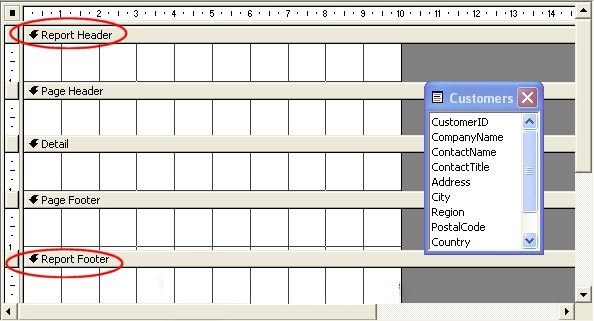
“Report Titles” are usually placed in the “Report Header” section.
The “Report Footer” section is often used to place calculation on fields. For eg, “Grand Total” of the sum of other fields in the report.
In addition to the field list we have here, as in the forms, the “Toolbox” (“Toolbox”) is at our disposal.
You can use this “Toolbox” to add “Labels”, “Graphics”, or calculation on fields.
If these are not visible, click “View” on the menu bar and select “Toolbox”.
Once the form is designed, you’ll actually want to see the form.
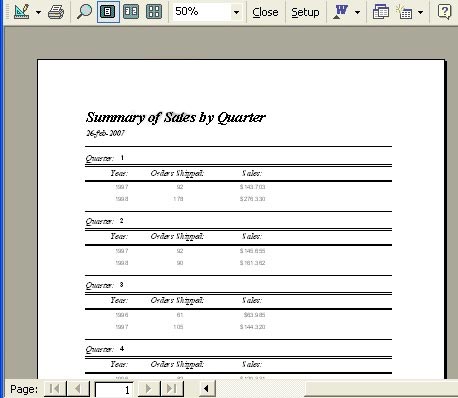
You can view the report and the taborder by clicking the “Print Preview” button.
If necessary, you can always go back to the “Design View” for some changes, before we print the report.
In “Print Preview”, we can see our report in a single sheet or multiple sheets, we can print our report or close the “Print Preview”.
Sorting and grouping data in “Reports”.
We can group data in our “Reports.”.
This allows us to group together fields that contain the same values.
We can then make the calculation of these fields with these same values.
This is typically used to calculate totals for a group of values.
Example:
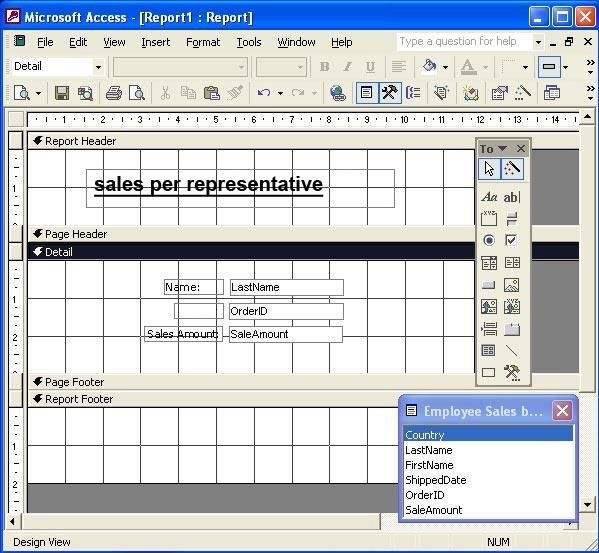
We select “Reports” in the “Objects window” and click “New”.
We click on “Design View” and choose our query (employee sales by country) from the dropdown menu.
Click OK.
We give our report a “Label” in the “Report Header” section.
And drag the fields that we want to show, into the “Detail” section.
For example.: Last Name, Order ID and Sale Amount.
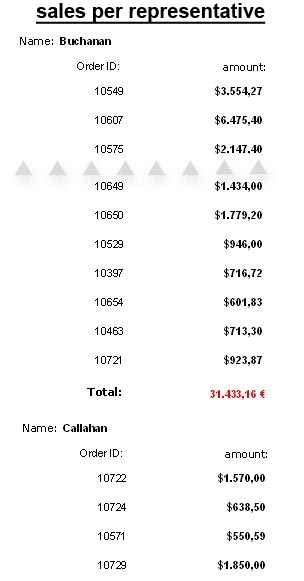
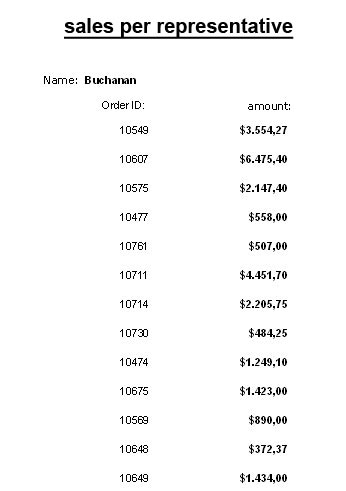
This gives us the following result:
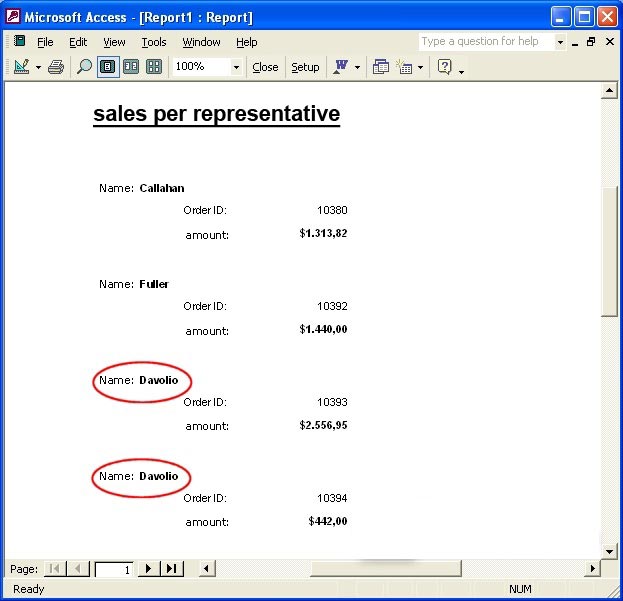
Note that we have recurring data in our report.
One of our salesman Mr.. Davolio, appears for each record of his in our form.
We can all group his records together to appear once.
To make a group of our vendors we first create a “Group Header”, so that the data from our vendor appears only once and placed in a “Group Footer” where we calculate total sales per representative.
We click on the “sorting and grouping” in the menu bar.
This opens the “Sorting and Grouping” dialog box.
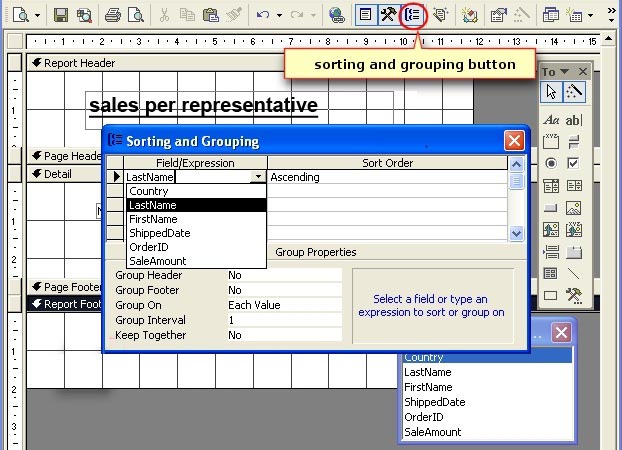
Here we click on the arrow in the first row of the field “Field / Expression”.
We choose a field that we want to group the data on.
We can also do this manually.
In the right half of the dialog can set descending or ascending order.
In the bottom half, we find the “Group Properties”
Click in the “Group Header” text box and select “Yes” to display a “Group Header”.
Select “No” if you do not want to display a “Group Header”.
In our case we choose “Yes”, you will see why later.
Click in the “Group Footer” text field and select “Yes” to a display a “Group Footer”.
This is where we need to show the total per vendor.
In the text field “Group On”, you can select each exact value of a field, which is the default setting in Access, or “Prefix Characters”, that selects the initial values of a field.
“Group Interval” indicates the values at an interval that you want to determine.
In the text “Keep Together” we determine whether we want to keep the groups together on one page. You can click No to select and it will ignore grouping it when we do not have room on the page for printing, You can select “Wholegroup” to try to keep all groups together on one page or if you choose “With First Detail” and the size of the group determines how Access will print the report. When the first group plus the header is too large to fit on a page, Access will continue on a new page and then only begin printing the report.
Click the “X” in the upper right corner of the window when you are done with the “Sorting and Grouping” properties.
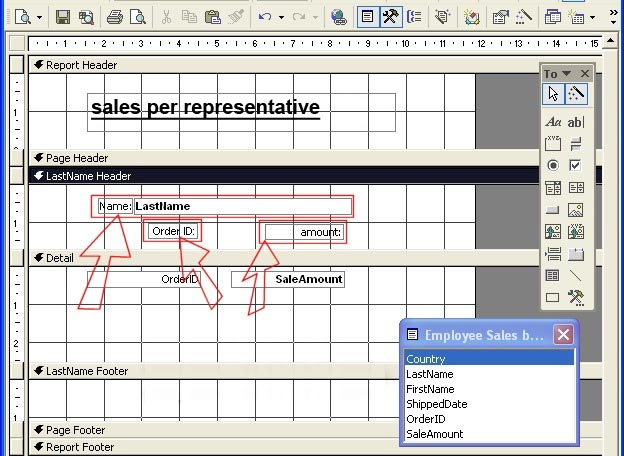
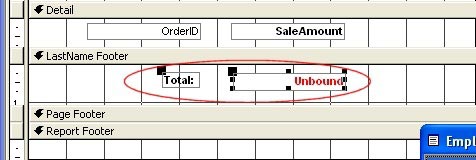
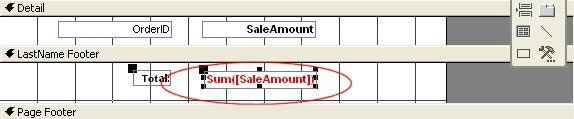
What we are going place in the “Last Name Header” section will be shown only once for each group.
So we can copy “LastName” field from the “Detail” section and paste it in the “Last Name Header” section It is unnecessaryto repeat a name for every record. We can do the same for the “Labels” of the fields “Order ID” and “amount”. However, the field values for these two have to repeat for each record, so they must remain in the “Detail” section of our report.
Save your changes and click on the “Preview” button to view our result:
Making Field Calculations
One of the most useful checks is the calculated “Text box” control .
.
It is a “Text box” to place the result of a calculation, in place of a field value from our database.
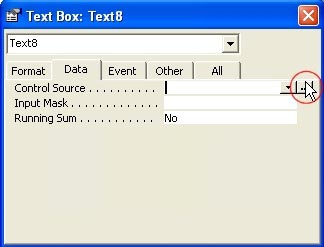
To add a calculation field, we choose the “Text box”control in the “Toolbox”.
Click and drag it to the “LastName Footer” section where we want to show the total.
You can see that the text we have just added, displays “Unbound”. This is because the field is not bound to any data.
Then select the text and right click on the field, and choose “Properties”.
The dialog box is opened for us.
Click the “Data” tab of the dialog box and select “Control Source”.
Click on the button ‘…’ on the far right of the textbox “Control Source”.
That in turn opens the dialog box “Expression Builder”.
This dialog box is used for functions and formulas.
We can manually type the expression in the upper section of the dialog, or we can use the elements we can find in the three windows at the bottom of the dialog box.
We choose the second option, so what we need to do is type a = sign in the upper part.
Then we add the “Sum” function.
In the left column under Functions, choose “Built-In Functions “. In the center pane, select “<All>”.
Look in the right pane and double-click “Sum”.
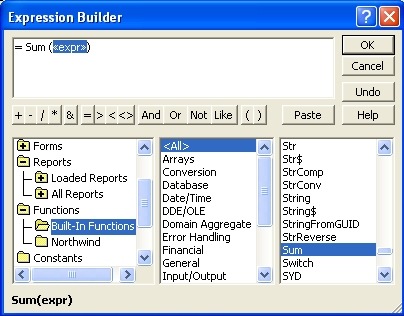
We select <<expr>> between the brackets in the top window.
Now we still need to enter this field into our report.
Double click on “Reports” and choose our report from the “Reports” loaded. In our case Report1.
Then we choose the middle window in the field that we refer to as random.
For us, that is the “Sale Amount” field.
And we are going to choose <VALUE> in the right-wing because we need to determine a value.
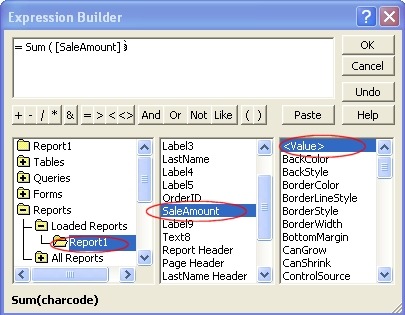
Then we click on OK.
We will also close the “Properties” window.
You can see that the changes have happened in the text.
The text “Unbound” is gone, and instead we see our function appear in there.
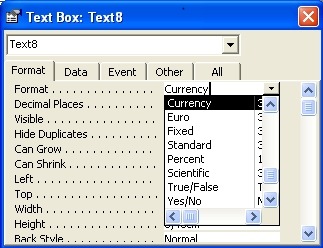
What we really need to do is format the field that we just created.
So we right-click the field and choose “Properties”.
In the “Format” tab, we choose Currency, since we’re calculating the sum of our sales.
Result: