Creating and Using “Macros”
A macro is a series of automated operations of one or more tasks by clicking a button.
A macro can be useful to users to work in your database.
You can perform tasks like close, open, print “Forms” or “Reports” by clicking a button.
You can also use “Macros” to check the data entered in a field and depending on the input of the user, a corresponding report is sent.
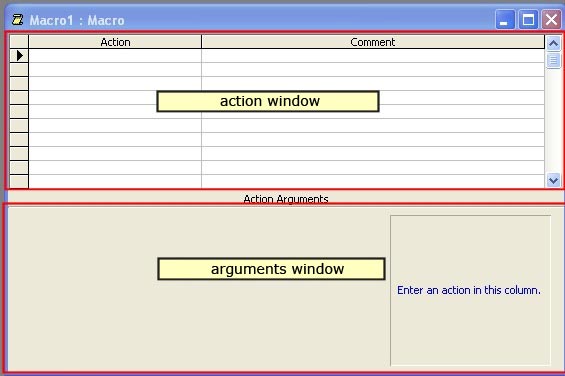
It is easy to do a “Macro Design Window” in “Access”
The “Macro Design Window” is divided into two parts:
The upper part is called the “Action Window”, where we enter our actions.
The lower part called the “Arguments window”, where we enter more arguments to the action to run smoothly.
Depending on the type of action that you run in the upper half, the arguments that we have to specify in the view in the lower half, are quite different.
Some have default arguments which we have to choose, in others we must enter the expression itself.
Some arguments are required in actions, like eg the “Open Report” action, you must specify which report. This is pretty obvious.
You open the macro design window by selecting “Macros” in the “Objects Window” and then click “New”.
When you have selected an argument, Access gives you some explanation about this on the right.
If you want more help, you can click the F1 key on your keyboard.
This can be very useful when using a “Macro” program.

Once all information is entered in your “Macro”, give the “Macro” a name and click OK.
That was easy.
For the “Macro” to “Run”, we select the “Macro” and we click the “Run” button.
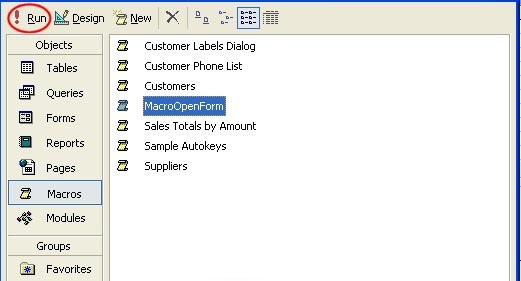
To edit or change a “Macro”, click the “Design” button.
You will more than likely create a “Macro” to “Run” when a button is pressed in one form or another. We will see this later in this lesson.
“Macro Actions “
When we create a “Macro” in design view, we will be intimidated by the number of choices we have.
Most of these are however, very simple.
Such as we have created above: “Open Form”
The only thing you must specify is in which window you want to open the form (the form itself, design view or print preview).
More complex commands can only be used in “Modules.”
A “Macro” can have up to 999 actions, which I think is more than enough.
You put the actions in the different rows of the upper part of the “Macro design window”.
Assign a button to a “Macro”
When you assign a button to a “Macro” and when it is clicked, this macro will automatically start to “run”.
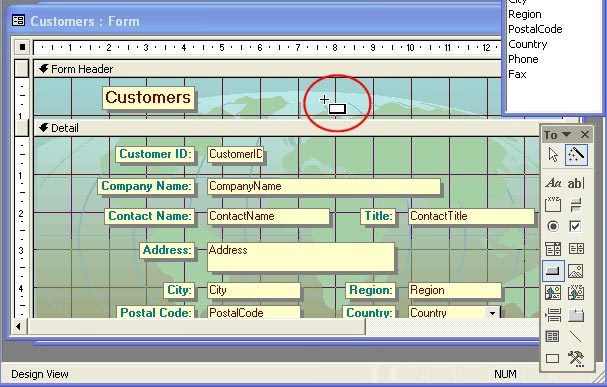
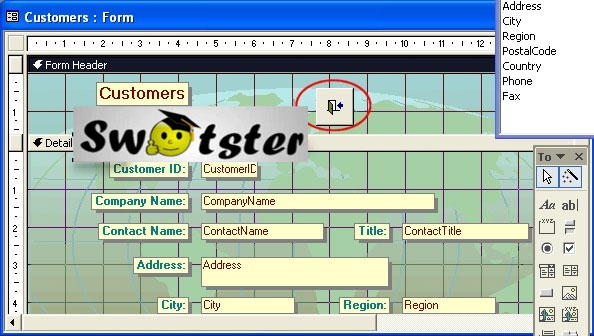
To create and place a button in an existing form, we open the form in “Design View”.
Let us consider the “Customers” form from the “Northwind” database and open it.
If this is not open, we open the “Toolbox”.
We first select the “Control Wizard”  button in the “Toolbox”.
Then we click the “Command Button” .
We click our form at the place where we want to place the button.
Wizard for the “Command button” opens as a dialog box.
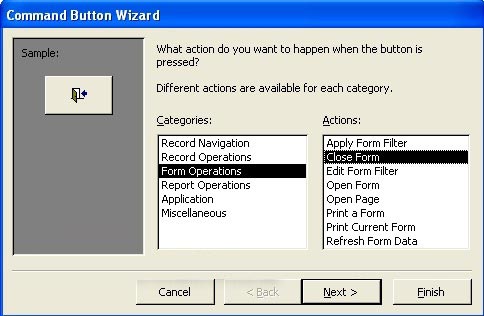
Here we find many categories and actions that is really too much to tell all about it.
Most of them are self-explanatory.
Click Next.
In the next window we can choose the layout of our button.
Make your choice and click Next.
In the next window you will have to give a meaningful name to your button, to refer to later.
Enter a name and click Finish.
Our button is added:
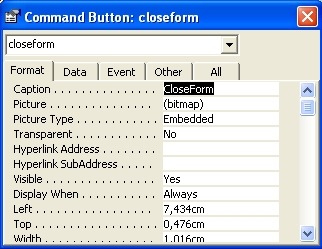
We can still move it by selecting it and drag it around like any other “Object” in the form.
We can also change “Properties” of the button by selecting it, right-clicking on it and selecting “Properties” from the menu.
Conditional Macros and Option Groups
In some cases, it is necessary to have a “Macro” “Run” on the basis of a selected option.
A Conditional macro can do this.
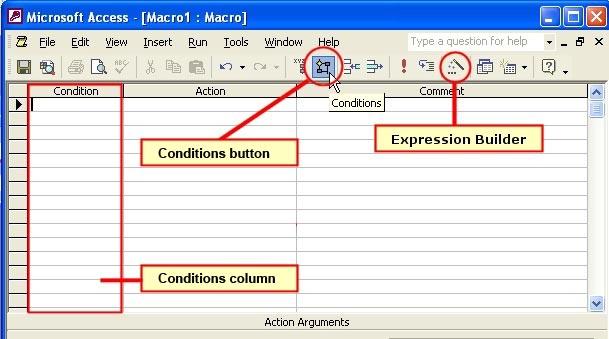
We can add conditions to actions in the “Macro” by clicking on the “Conditions button”.
When we click the “Conditions button”, a column is added to the “Action window”, ie the condition column.
It is here that we set the conditions which, if fulfilled
(“True”)
perform the associated action.
We can enter the condition itself or we can use the “Expression Builder”, which you will find in the toolbar.
Ensure that you enter the condition on the same row as the “Action.”
Often conditional macros are used to evaluate or set specific options in an “Option Group”.
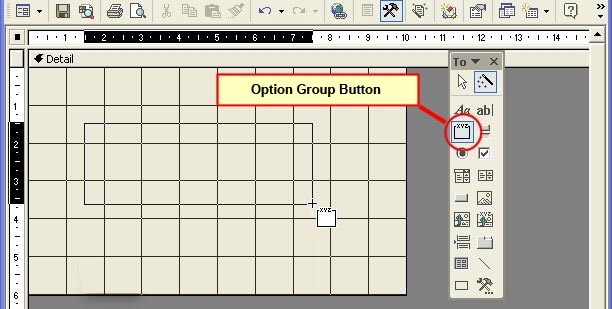
We can add an “Option Group” to our form by clicking the “Option Group” button, then click and drag in section of the form where we want to place it.
Let us first create a blank form.
Save it as eg “Sample Form”.
We then add an “Option Group” control to our form:
First select the “Control Wizard” button in the “Toolbox”.
Then select the “Option Group” button, and click and drag it to the place in the form.
The “Option Group Wizard” dialog box opens.
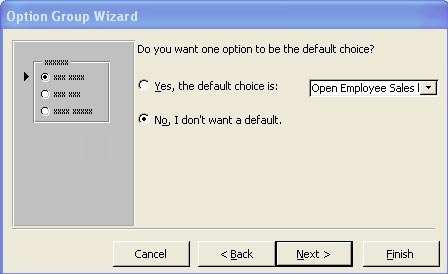
In the first Wizard window, we must select whether or not we want to enter a default value.
We select No.
And click Next.
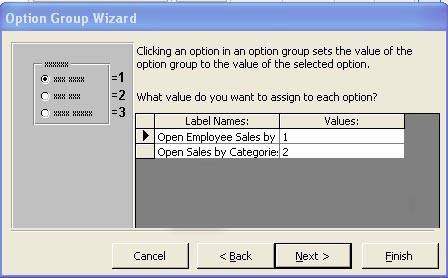
In the second dialog, we give a “Label” that appears on our form, and a “Value” for each “LabelName”.
We click on Next .
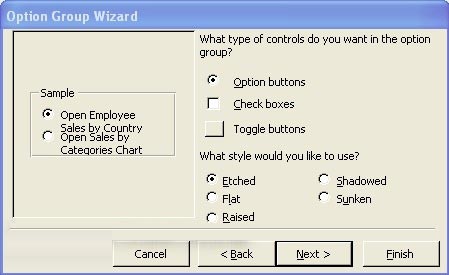
In the third window, we determine what type of “Controls” we desire. Here, we opt for radio buttons.
And for the style we choose “Etched”. (An example of this can be seen on the left side of the window).
And click on Next .
In the last window we give a name for our “Option Group “.
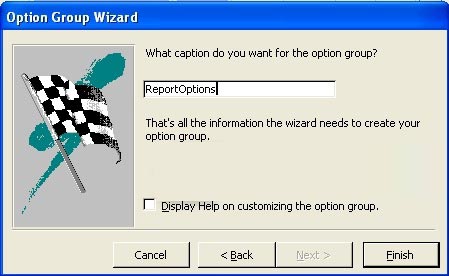
And click Finish.
The dialog box closes.
Now we will add a “Command Button” to which we apply our “Macro” later.
Save the form eg: Sample Form. (Do not close it because we will use it immediately)
Now we create the “Macro”, for our button in the form:
Select “Macros” in the “Objects Window” and click New.
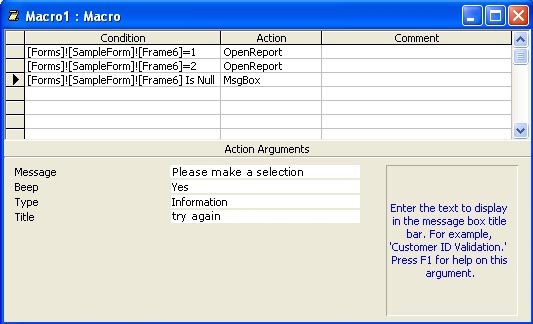
In the “Action Window” of the “Macro”, you first add the “Condition column”.
To do so, click the “Conditions button”.
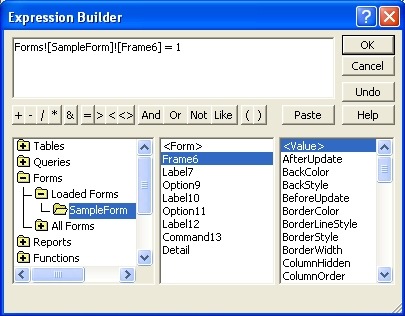
Place your cursor in the first line of the column conditioning, and click the “Expression Builder” button.
In the “Expression Builder” window, I want to know the value (value) of the radio button (option).
So we need to make a reference to the “Option Group” within the form which we have just created.
So in the left pane of the Expression Buider we click on “Forms” – “Loaded Forms” – “Sample Form”.
In the middle pane we choose Frame6 which is the name of the “Option Group”.
And in the right pane, we double click <Value>.
It therefore refers to that particular object.
Then we also want to know if this expression = 1.
Then we click OK.
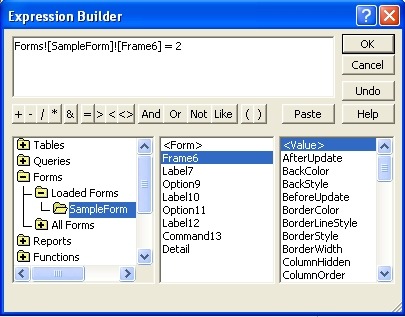
We do the same again on the second line in the Condition column of our Action panel.
But now give 2 as expression.
You can also copy the first line to second line, and change the 1 in 2.
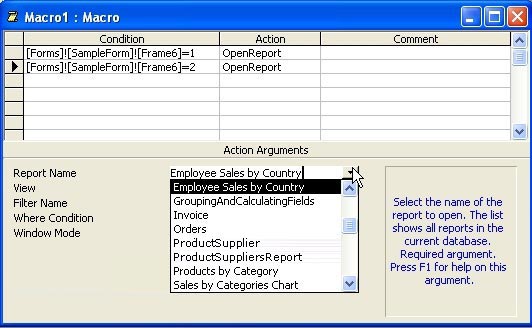
We give the actions for each condition:
So we give “Open Report” in the “Action” column.
And in the “Arguments” section, we enter the Report Name, and make a choice as “View’.
We can eventually enter a third condition:
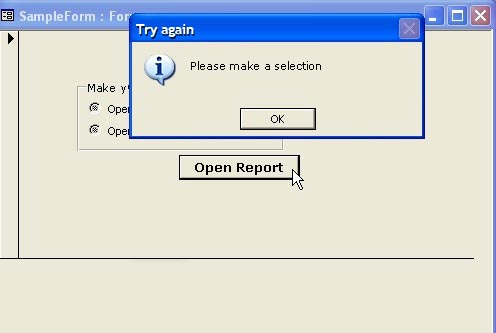
When nothing is selected, yet if the button is clicked, we can display a warning dialog where the user is warned that he must make a choice.
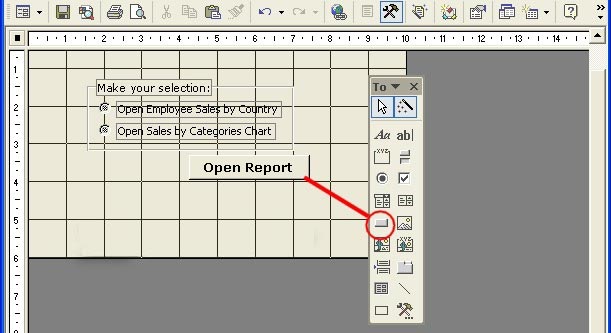
We propose this as in the image below.
Here we give the “Condition” that expression “Is Null”, which means that none of our radio button is checked.
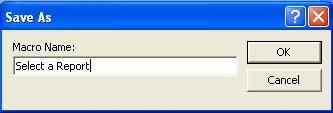
Save the Macro
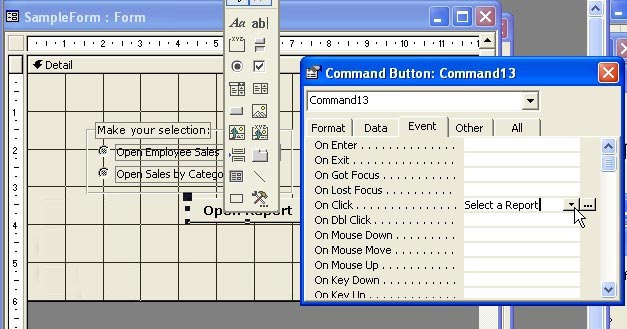
Now we have the button in our form to assign the “Macro”.
Right click on the button where you want to assign the “Macro”.
On the “Event” tab, we choose “On Click” and choose the “Macro” that we want to “Run” from the dropdown menu. In our case the “Select a Report” macro.
Save the macro
And we try our form:
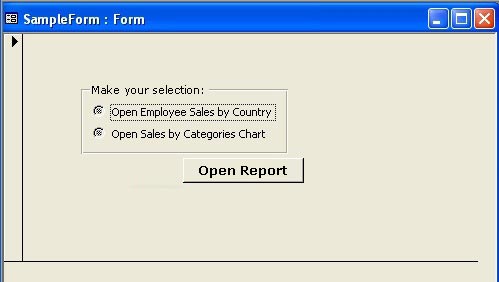
As an example I clicked the button without choosing any of the options, and guess what, it works perfectly.
It shows us the warning window with the message that we must make a choice.
The rest of the options are also correct, so our “Option Group” works perfectly in our “Macro”.
The use of “Macro Names” in “Macros”
We can create “Macros” with multiple actions, maximum 999 (remember).
It is not necessary that all actions are carried out each time we “Run” the “Macro”.
We have the possibility of invoking one or more actions.
We can do that with “Macro names” in “Macros”.
To use this , we need a column, the “Macro Name” column.
Click the “Macro Names” button.
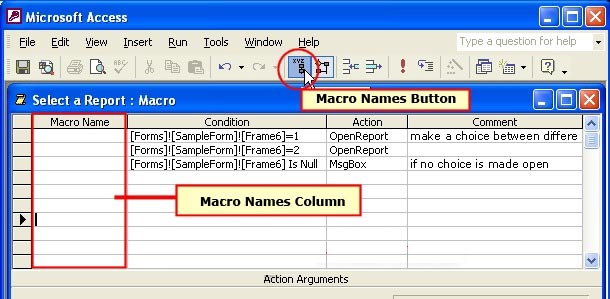
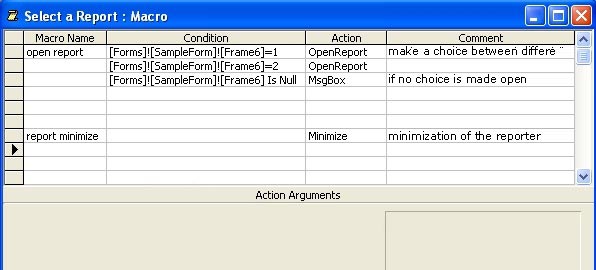
We add names for different parts of our “Macro”
We open our form, clicking the right mouse button on the form object and select “Properties”.
We click on the box “On Click”, we see that we now have a choice of three different actions from our “Select a report” macro.
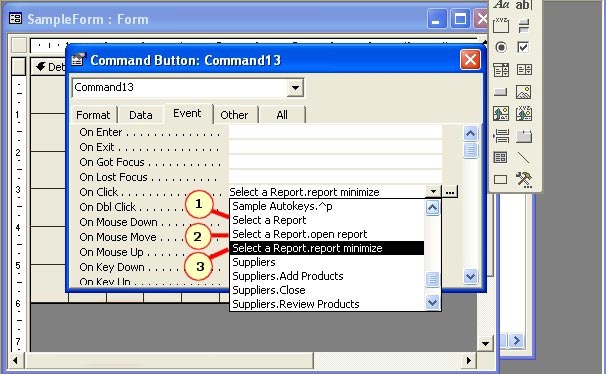
1. the entire macro “Select a Report”
2. the group name Select a Report.open report
3. the group name Select a Report.report minimize
If you wish, you can assign different command buttons to run all these different groups.
Autoexec macro
These are special macros.
As soon as you open a database it will “Run”.
This can be any action that we give a “Macro”: opening a form, open a report, a message etc…
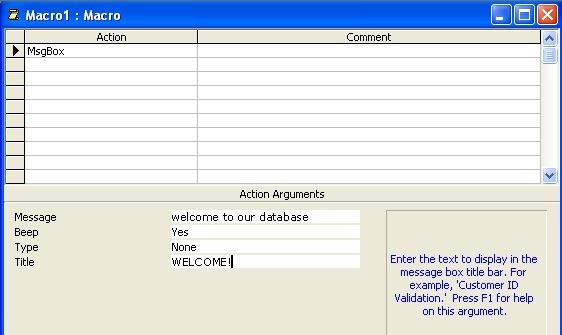
As an example, we have a welcome message to appear when we open our database.
We make a new macro in the usual way.
We give “MsgBox” action, with the arguments:
Message: welcome to our database.
And Title: WELCOME!
We give the name of this “Macro”: “autoexec “
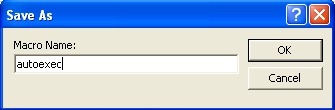
and click OK
That’s it.
The next time we open our database we first get a nice welcome window.


