A database should be logical and simple but not complicated. In general, we use forms in order to add data. The data is stored in the “tables” which in turn have a relationship with each other. Through the use of “queries”, we can then retrieve specific information from these “tables”. These “queries” are used in creating “reports”.
Creating a new Database
A new database is simply a new organized container that keeps each table, form, report, query, macro and modules.
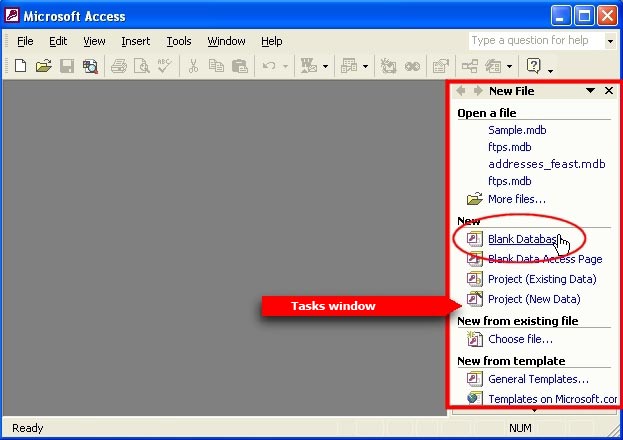
Click the “File” button and select “New” from the drop down list. This will open the tasks window. Here we choose “Blank Database”.
A dialog box appears in which you enter the name of the new database.
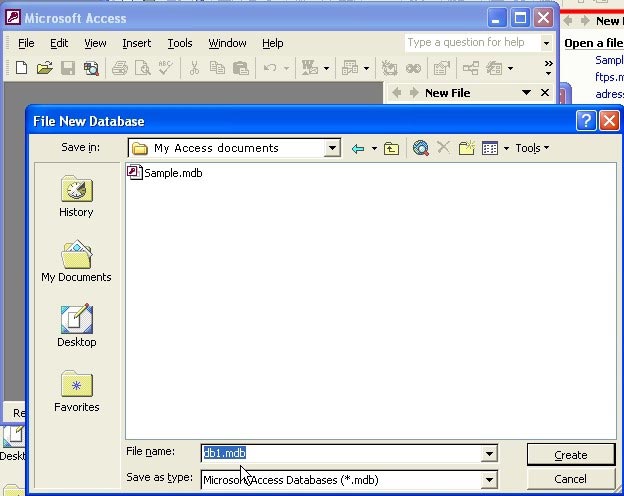
Now choose the folder where you want the database stored and click “Create” button.
The card or “Flat File”
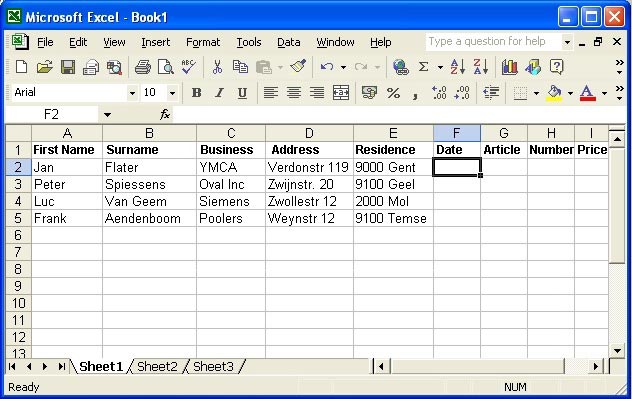
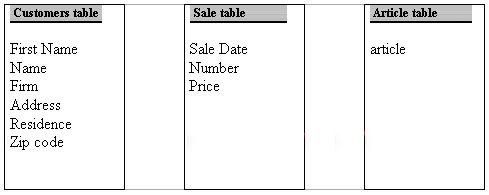
For many types of databases or lists, the structure shown above works.
This is a typical example of a “one-to-one” (“one to one”) Relationship, what this means is that you only have one piece of information register (such as Name, Surname etc.) given for each one, in this case, the customer.
But what would happen if a customer places multiple orders now or he orders several products?
We will have to add a new column for each order and each article or add a new column. This is not very practical.
So if we want to link our customers to all their purchases, a “one-to-many” (“one-to-many”) relationship is the solution.
So we come to our relational database.
Conclusion: For a simple card access, we do not need this, we can do with Excel. (See image above)
The relational model for data storage
The relational model of data storage allows us to easily and effectively make a complex concept, for eg. “Sales”.
The relational model for data storage eliminates redundant data, which then results in a smaller and faster database.
When we design a relational database, it is a good practise to first write down all the data we need from the various tables and their relationships on a paper.
Then we make a few drawings of the “tables” with their fields and their information.
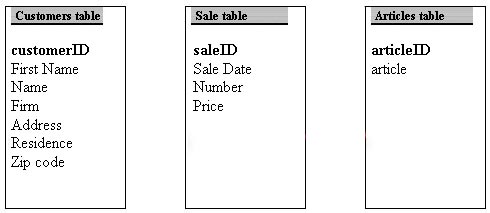
Once we have a rough idea about which tables we should have to store our data, we should focus on ensuring that each table has a “primary key”.
A “primary key” is a column (or a combination of columns) which is a unique value to each row in the column.
For example: You might have two people with the same name eg Peter De Smet, yet you can distinguish between these two people by adding a column with a “primary key” to each table (eg customerID, saleID, productID) before the name column.
The “primary key” is very important in relational database because it is by that “primary key” that we can establish “relationships” between tables.
For example, consider the relationship between customers and sales table, you can have a customer with multiple orders, so the tables must have “one-to-many” (“one-to-many”) “Relationships”.
This is the most obvious relationship between the tables.
What we then need to do is find a solution to the “many” table to connect to the “one” table.
ie we must show how each row (set of values) given in the sales table is related to the customer table.
In order to link the tables together,they must have a shared or common disposal field. This must be a field with the same data in both tables.
In this example, we try to assign each sale to a customer.
To do this we must add a field to the sale table that corresponds to a field in the customer table.What do we add?
The answer is the “primary key” field.
Remember that each “primary key” field is unique, to be able to identify data in a table.
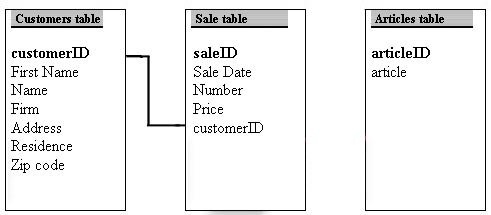
Thus we can add a field to the sale table that refers to the customerID in the customer table.
So in the future sales record, we just insert the customerID for the customer to whom the sale was made. (The first time we reduce redundant data).
Now it is clear how we take advantage of a relational database.
We need information about a customer only once by entering their assigned unique customerID.
So if we enter a sale for customers in the sales table, we only need to refer to the relevant customerID of that sales record, to be able to identify who made the purchase.
This requires that we have far less information to enter, which in turn results in a smaller and faster database to compare with our card or “flat file”.
It is important that the customerID field that we add to our sales table is not a “primary key” . This table already has a “primary key”, the saleID field, which is unique, identifying each sale.
Technically, we call the field in the “many” table as the “primary key” and refer to the related “one” table field as a “foreign key”.
Its sole purpose is to connect two lists. The values within a “foreign key” are almost always not unique.
Do not worry about how we actually enter the data when the tables are connected with each other or how we set “primary key”. We will come to this later.
For now, try to understand the concept and reasoning behind the relational database design.
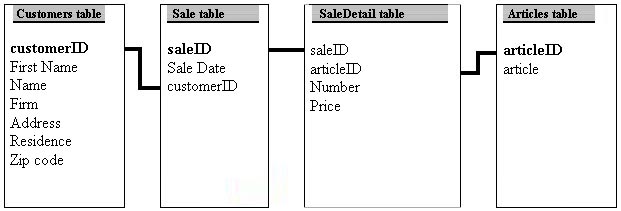
Take a look at the chart below to see how it has changed with the recently made connections between customers and sales.
Now we go back and examine what the different “relationships” between the tables can achieve.
For example, what is the relationship between customers and products?
Each table is not directly connected to another. The only way that customers and products are connected is when a customer purchases an item.
Although, in a relational database, as long as each table is connected in the appropriate way with the correct table, we can figure out how they are related and in which way they are connected.
In summary, the clients are connected to the articles, but only by the sales.
So how is it connected with the sale items?
Well, for every sale there may be multiple items and a sale can occur several times on an article.
In a relational database, you may (or you would) not make a “many-to-many” (“many-to-many”) Relationship.
That would not be logical.
We need to see which items are ordered for any order while we entered data to a minimum.
We also see another problem arise: “Number” field is placed in the Sales table.
How can we enter price of the product at the time of registering a sale? What if the price changes in the future?
Is “Price” an attribute of the “Item” table?
What we see is that we should be able to make a link between the unique selling records with unique items that are ordered in those sales.
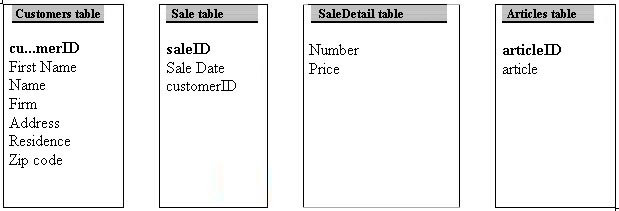
For this we need a “Sales Detail” table.
But what do we place in the “Sales Detail” table?
The answer is, anything that is an aspect of the “many” side of the transaction.
For example,
the “Sale Date” field in “Sales” table may remain, since each sale only happens once.
The number of items purchased on sale is actually a “great” aspect of the sale, and should be moved to the new table “Sales Detail” with the “Number” field.
The customerID field should remain in the Sales table, because each purchase is only done by one customer.
Let us see how the new table “Sales Detail” influenced our diagram:
We must also think of giving our new table “Sales Detail” a “primary key”.
But before we do so, let’s see the relationship is between the “Sales” table and the “Sales Detail” table.
The lists are related in the sense that each sale may have one or more items.
So, we want each record in the “Sales Detail” connecting to the “Sales”.
To do this, we make a “foreign key” in the “Sales Detail” table, which is connected to a “primary key” in the “Sales” table.
So we add saleID field to the “Sales Details” table.
What is the connection between “Sales” table and the “Sales Detail” table?
For each transaction of items ordered in the “Sales Detail” table, it must create a reference in the “Item” table for a unique product.
So we want a “foreign key” from “productID” to be created in “Sales Detail” table.
Only then can we make a connection between their common fields.
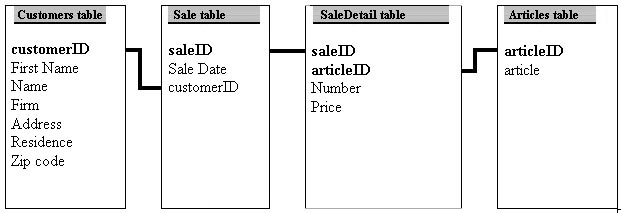
Let us see how the charts look after these two changes:
Now that we have the necessary relationships between the tables we made, we still need a “primary key” to be created in “Sales Detail” table.
We would add an additional field, eg. SalesDetailID, but we can also see if there is a combination of fields that gives a unique value.
Well, who would have expected ;-), there is one: the combination of saleID and productID. They will never have the same values occur in these two columns.
If this were the case, it would mean that the same article would occur twice on the same order. If so, there would be a two in the field “Number” and not of the same value.
Let us’ s look at our diagram:
Tips for creating relational databases
There are no rules to create relational databases, but here are a few tips:
- See that all the information you want to use is entered before saving the data in your database.
- Think about what the database needs to report, the forms to enter data and to whom the database is designed.
- When creating your database, start with a model as described above with various “relationships”. This is very useful for determining the structure of your database.
- It is also important to know how data is stored in your database independent of how the users enter the data into tables through forms. Once we learn more about “forms”, this will be clear.
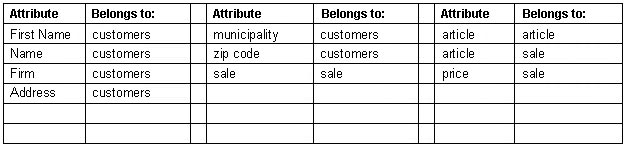
When making a model, you can start by making a list of the “tables” along with their properties and fields that you need. You can also find it easier to record the fields and then find out which field belongs to which table.
Once that is achieved, we can place the fields in the tables and we can set a “primary key”. Then we can define the “relationships” between the “tables”.
Creating a relational database table
After all this theory, it’s time we start practicing.
We therefore open Access and create a new database. To do so, we click on the “New” button ![]() and choose “Blank Database” in the tasks window on the right.
and choose “Blank Database” in the tasks window on the right.
We have chosen sales as a name for our database.
The first thing we do is create a table of our customers.
- Double click on “Create Table in Design View” (Create table in Design View)
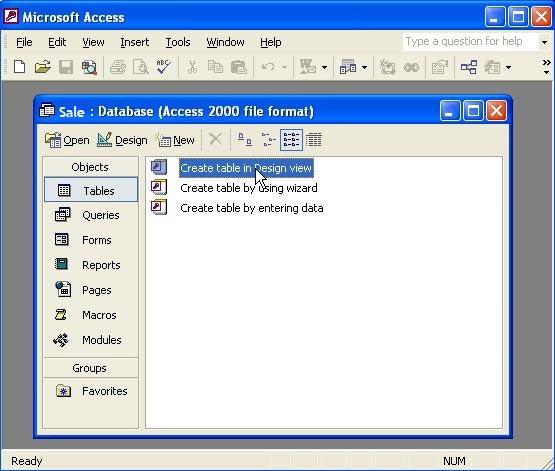
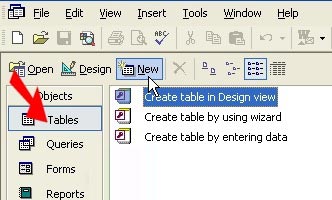
Or you can also click the “New” button (“New”) in the toolbar.
Please note that you have chosen “Tables” in the object panel (“Tables”).
This will open the “New Table” (“New table”) Dialogue window.
We choose “Design View” (“Design View”) And click OK.
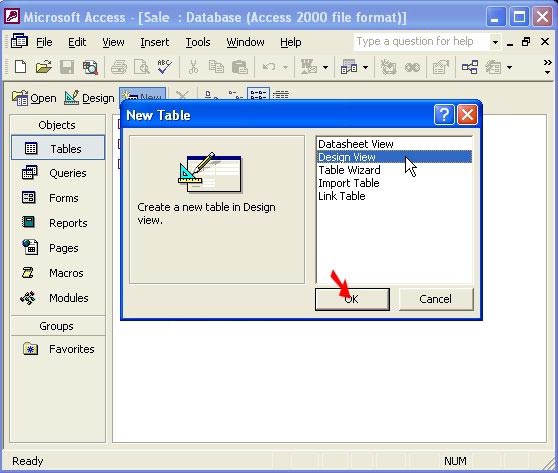
This brings us to the “Design View” (“Design View”) of our table.
Once we have entered a field name, we see that our window has two parts:
- “Datasheet View” (design grid)
- “Design View” (field properties)
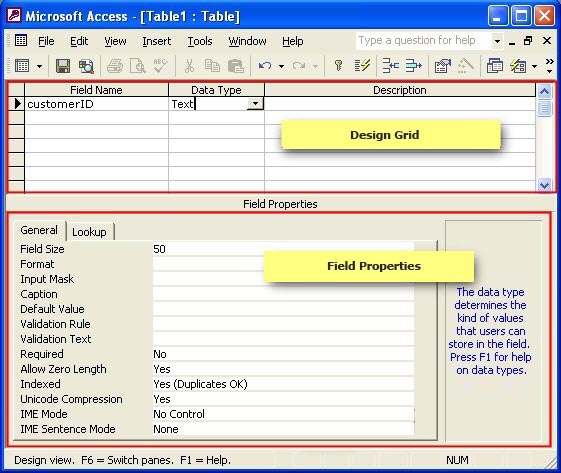
In the upper part we enter all fields and their data types which we need in our table.
In the lower part, we give the properties for each field.
In the upper part of our top window, you see a grey arrow.
This is the row selector. When you click it, it selects an entire row. You will need to use this several times to get familiar with it.
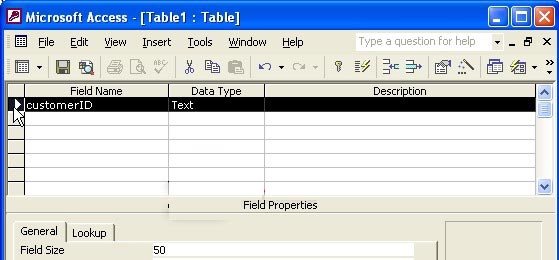
The “Field Name” (“Field Name”) column is where we enter names for our new fields in the table.
The names you enter must not repeat in the table, ie it must be unique.
If you plan to write VBA code later (a module) for this database, you can not use spaces in the name.
The order in which you use to add field names is from left to right in the “Datasheet view”.
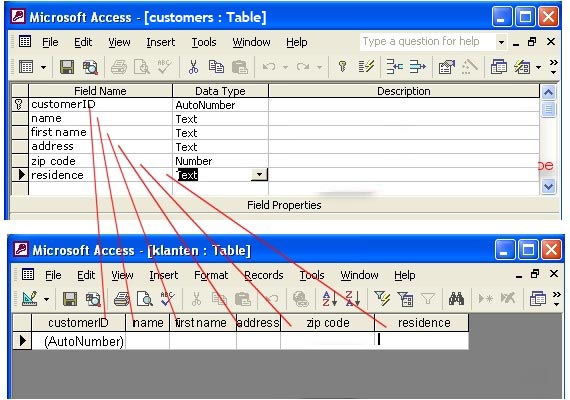
After assigning a field name, we must also assign data type for this field.
The default value is always “Text”, but we have more possibilities:
text, number, date / time, currency, etc …
Below are the different data types and their descriptions:
|
Name |
Definition |
|---|---|
|
Text |
Contains text, or a combination of text, numbers, and other information. The maximum length is 255 characters |
|
Memo |
A longer version of a text field. The maximum length is 65,535 characters |
|
Number |
Can only contain numeric data. You may want to apply edits on them. No phone numbers or postal codes. |
|
Date / time |
Contains a Date or Time. Useful for Date / Time operations. |
|
Currency |
Similar to the Number data type, but is formatted as currency. |
|
Auto Number |
Assigns a unique number to all records in the table. (Useful as a primary key field. |
|
Yes / No |
Logical data stored as “Yes / No” or “True / False” or “On / Off.” |
|
OLE Object |
Connect one area to another in a Windows application. You can use OLE Object data types for additional charts, calendars, or video / audio files. |
|
Hyperlink |
Includes a hyperlink address on the WWW |
|
Lookup |
Allows you to set up a lookup list field, which can contain values from another table or query. Useful for combo boxes and list boxes. |
The lower part is the “Design View” (field properties) Section.
It consists of two tabs “General” and “Lookup” (General and Lookup). Here we determine the properties of the field.The lower part is the “Design View” (field properties) Section.The lower part is the “Design View” (field properties) Section.
We will discuss this in detail in another lesson later.
Creating a Primary Key in a table
In Access we need to assign each table a “Primary Key”. A “primary key” is simply a field or group of fields that acts as a unique identifier for each record in the table.
The benefits of assigning a “Primary key” will be more and more obvious when we access more and more.
You will see that when you assign a “Primary Key” to a table, this will automatically sort itself.
Because the “Primary Key” gives a unique value to your record, they are never going to be two identical records in our database.
You can assign “Primary Key” to a field by selecting the field and clicking the “Primary Key” button.
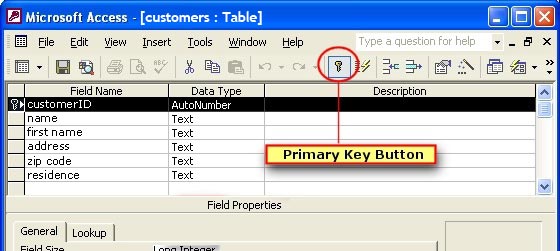
You’ll see a picture of a key on the left of the CustomerID field which is an indication that we have the “primary key” assigned to that field.
If we wish to remove the “primary key”, we have to first select the entire field (highlighted in black) and click the “Primary key” button.
If you wish to assign “Primary Keys” to multiple fields, hold the “Ctrl” button on your keyboard while you select the fields and then click the “primary key” button.


