How ProShow works with layers
If you want a good knowledge of how ProShow works, then it will be useful for you to know how to deal with layers. All visual media that are added in a slideshow are covered in a layer. What this means is that each image or video that you use is treated as a layer when it is added in a slide of your show. Working with layers is important to be able to customize slides. Each image or video is considered as a layer.
The simplest way to understand what a layer is, is to see it as a “box” for your pictures and videos. You add photos to your slide. ProShow places them in a box that takes that picture and makes it a part of the slide. This box allows you to make various changes to the photo. Because it is a layer you can move it, make changes, change the size etc.Of course, you can not see the box. This is just an idea to understand the concept of a layer, better. You can treat your photos as a single layer.
Stacking Layers:
ProShow allows you to use an unlimited number of layers in a slide. These layers are stacked upon each other. You can compare this with a card game. Each picture can be compared to a card.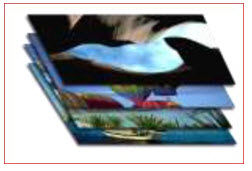
If you stack it up perfectly you will see only the topmost card. If you spread the cards you’ll be able to see a little of what’s underneath. Lay out the cards side by side you’ll be able to see them all, assuming you have enough space to do this.
This is exactly what we’re doing.
Each image or video that you add to a slide is in the layer stack. You can specify where each layer is to be placed in the stack.
Adding layers in a slide
There are several ways of operating different features in ProShow and adding layers in a slide is no different. Here are some options that you can use to add layers in a slide.
Method 1: Adding a New Layer from [Slide Options]
- Double-click a slide that is available in your show. This will open the [Slide Options] window.
- Click on the tab, Layers- Layers Settings (Or select the tab where the layer list is displayed as shown below).
- In the layer list click the [+] icon (To add a layer).
- Select “Add Image or Video” in the menu that appears.
- Then search for your image in the folder list, select it and click [Open].
Using this Layer List to add new layers through the [Slide Options] window is a straight forward, easy way but this 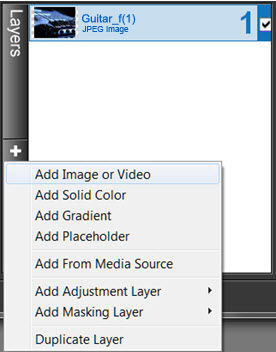 is not the easiest or the fastest one.
Point to remember: You can also add a layer somewhere in the layer list by right clicking and selecting “Add Layer” in the menu that opens.
Method 2: Clicking and dragging from a system folder to the slide list
- Click on the image you want to use as a new layer in the Folder List.
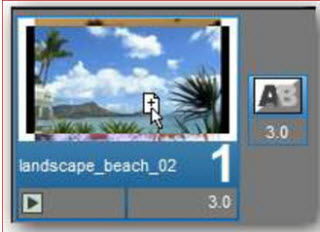
- Drag and drop the image on the selected slide while keeeping the [Ctrl] key pressed on your keyboard. To see if it works, check if the mouse pointer is in the shape of a magazine while dragging the image. This method will place the image on top of the stack in the slide as a new layer.
You can also do this with multiple images, simultaneously.
- For successive images: Select them using the [Shift] key and drag them keeping the [Ctrl] key pressed, to a slide.
- For randomly selected images: Select them using the [Ctrl] key and drag them keeping the [Ctrl] key pressed, to a slide.
Each image in this slide will be on a separate layer.
Note: The use of this drag and drop method of adding layers can be visually confusing. That’s because when you create a new layer in an existing slide this becomes the topmost layer. The thumbnail is also adjusted but when this new layer covers the entire slide, it stays exactly the same or the previous image is replaced. To check, double-click the slide and in the [Slide Options] window you can see the layer list.
Method 3: Adding layers with a right click
There are some options to add layers to your show by using the “right click” menu in the folder list. You can right 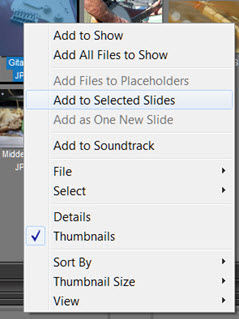 click anywhere in the folder list to get this menu. Here you will find some useful options.
- Adding layers to the Selected Slides(Add to selected slides): Select the slide where the new layer is to be placed. Then select the image(s) or video(s) you want to add in the folder list. Right click and select [Add to Selected Slides]. All the files will be added as new layers.
- Adding layers as a New Slide (Add a new slide): Use this option to create a new slide with one or more layers. Select the files you want to use, right click in the folder list and select [Add as One New Slide] from the menu. A slide is created with the selected layers.
Point to remember:
With the same menu you can also use the following options:
- Add to Show (Adding a layer to the show): Select an image, right click and select [Add to Show] from the menu and you get a new layer. This can also have multiple images. Each image is a separate layer.
- Add All Files to Show (Adding all files to the show): Right click anywhere in the folder list and select [Add All Files to Show] from the menu. Each file will be added as a new slide.
Even music can add from this menu.
- Add to Soundtrack (Add to Soundtrack): Select your music in the folder list, right click and select [Add to Soundtrack] from the menu.
Method 4: Directly clicking and dragging from [Slide Options] to the layer list
The easiest way to change the contents of a slide is by dragging your images directly to the layer. Double-click the slide tab in “Slide Options” and select Layers- Layers Settings. Select an image in the folder list and drag it to the layer list. So you can select a file from any folder on your PC and drag it to this layer list.
Usage of the Layer List
The “Layer-list” is one of the primary tools which is used to work with layers in your slide.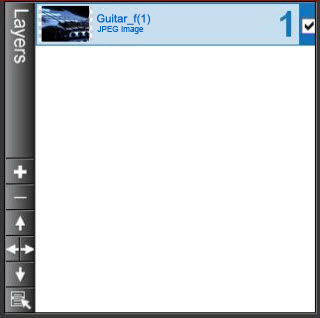
You can use the layer list to control the order of your layers, to add new layers or remove them and work with advanced techniques such as “Masking.”
Understanding how the layer list works is a very important step in the use of layers as part of your slide show.
Where do you find the layer list
The Layer List is a common option that you find in most of the tabs of the [Slide Options] window except the [Captions] and [Sounds] tabs.
The layer list remains the same wherever it is in the various tabs.
The composition of the Layer list.
The Layer list has a central portion where the thumbnails and the name of each layer is displayed and you have a toolbar on the left.

You will always see at least one layer in the list. Remember that any picture or video will be placed in a layer. All layers are numbered. It also contains the name and file type of your file.
Checkbox
On the right, next to the number, you have a check box. This is used to specify whether the layer is active or not. This can be useful when you work with many layers and there are some layers that you are temporarily not dealing with.
The Layer Name and Notes Section
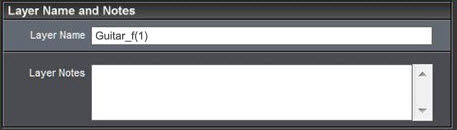
At the top left corner of the Layers> Layers Settings tab you have the above textbox. The layer name is displayed and can be changed when repititions occur. You can also right click on the layer in the layer list and then select “Rename Layer” from the menu.
There is also a textbox where you can make notes. These notes can not be seen by others who view your show. It can be used as a tool in creating your show. When you add a note to a layer, you will see a thumbnail “paper” icon on the layer. Therefore you can immediately identify which layers have a note.
Toolbar
To the left of the layer list is the “toolbar”. This toolbar contains several buttons that you use to create, delete or 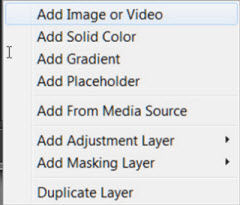 organize layers.
At the top of the list you have the [Add Layer] button. When you click [+] to add a new layer you get a sub-menu that asks you what type of layer you want to add. You have the following options:
Add Image or Video (Adding an image or video)
This option opens up the explorer on your hard disk where you can search for images or videos that you can add to the new layer. This is the most common option.
Add Solid Color (Adding a solid color)
Selecting this option allows you to create a new layer where you can specify the color.
Add Gradient (Adding a gradient)
You can create your own layers alongwith a gradient with this option.
Add Placeholder (Adding a place holder)
This option displays a new blank transparent layer.
Add Template (Adding a template)
Selecting this option adds a new “template” layer. This is a blank layer without images or videos. This is most useful when you want to create an effect without relying on images.
Add From Media Source (Adding from a media source)
As is standard with the installation of ProShow Producer a few folders along with their contents are placed on your hard disk. This is called the “Media Source”. With this option you can quickly use this information for new layers.
Add Adjustment Layer (Adding a “customized” layer)
This option creates a special layer that somewhat resembles a mask. But we will come to this later.
Add Masking Layer (Adding a mask layer)
Selecting this option expands a subset of your normal layer options. Again, we will come back to this later.
Duplicate Layer (Double layer)
This option creates an exact copy of the layer that is selected in the layer list. This image contains all the information of the layer, the image, the movements, effects, etc…
You can create many types of layers using this button [Add Layer] and will probably use it more frequently while creating your shows. These options can also be found and used by right clicking anywhere in the layer list.
Remove Layer (Removing one layer)
This button [-] is simple to use. Simply select the layer you want to delete and click the [-] button and the layer disappears from the slide.
Arrow Icons (arrows)
The arrows are used to specify the position of the layers. As you know, the layers are stacked.
The “Top” and “Down” arrows will move the selected layer up or down in the list. This allows you to organize your layers in the slide. Also, You can use the mouse to drag and move a layer.
The “Left” and “Right” arrows are used to mask layers. This is something which will be discussed later.
The Layer Menu (The layer menu)
The last item in the toolbar is the layer menu. This menu includes alternative ways for selecting the various options dealing with layers.
Several of these options will be encountered in later lessons.
There are 2 unique options in this menu.
- Reset Layer: This option will ensure that your layer is placed back in its initial state. All changes made will be deleted.
- Remove All Layers: This option will completely strip your slide to a blank slide. It will not remove the slide itself but the entire slide content.
Changing a layer (swapping)
When you drag a file, from its position to the thumbnail of an existing layer then the content will be changed. The settings are retained.
Point to remember: Do not move the material
Its better if the material being used in a show is not moved on the hard disk. It is not a big problem if you move or rename the but while opening the show later on there will be some puzzling questions to be answered.
File types supported
ProShow supports several file types for images, video, audio, fonts …
- For images: eg JPG, JPEG, BMP, POISON, PNG, PSD, TIF, TIFF
- Search for: eg AVI, MOV, WMV, MPEG, MPE, MPG
- For Audio: eg. WAV, MP3, WMA, OGG, PSA
More information can be found in the annexure – File Types.


