Before we start the next lesson we’re going to clarify some functions.
In the [Slide Options]> [Effects]> [Motion Effects] tab, you have several options: namely, [Pan], [Zoom X] [Zoom Y], [Rotate], and [Smoothing].
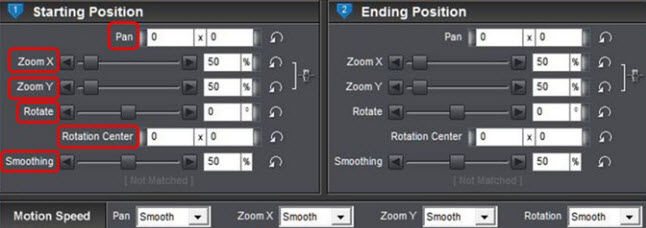
Pan boxes:
W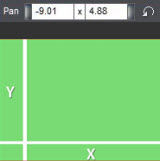 ith this option, you can determine the location of your image on the screen.
The first box is the X-value and the second is the Y value. X is the horizontal line, and Y is the vertical line. If you drag the image with the mouse around the screen you will see that the values of X and Y change accordingly.
After these boxes, you have the [Reset] button. Click it and you will be brought back to the initial position = 0 x 0.
There is a tool that helps you place your picture or photo at an ideal place on the screen.
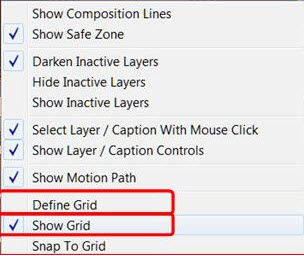
Right click on the image and you will get the following popup menu.
By selecting the [Show Grid] option you can place guidelines on the screen.
These guidelines can be adjusted so that they are useful for your work. 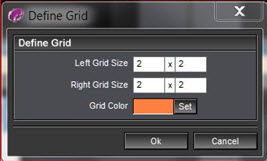 Right click your screen again and select [Define Grid]. This allows you to adjust the number of boxes that you want to see on your image on the left and right. Simply enter the required number in the boxes. In this example, this is 2 x 2 = 4 Boxes. It is also possible to change the color of the guidelines.
Click [Set] and select your favorite color from the color wheel.
Zoom X and Zoom Y

As you can see, there is a chain after these boxes. By clicking on this chain, you can open or close it.
If the chain is closed, then the proportions of your image is maintained. You will see that if you change the value of [Zoom X], [Zoom Y] automatically adjusts to these changes as well.
If the chain is broken then the relationship is broken. In this case you can change both values independently.
Zoom works in several ways. You can use the slider. You can enter a specific value. And, you can also use the roller on your mouse to zoom in or out.
Rotate (turn)

As the word says you can rotate a layer. You can get a full circle you when you’re rotating the layer from -360 ° to 360 °. It is possible to move the center of your circle. To do this, use the [Rotation Center] option.
Smoothing (smooth smooth, smooth)
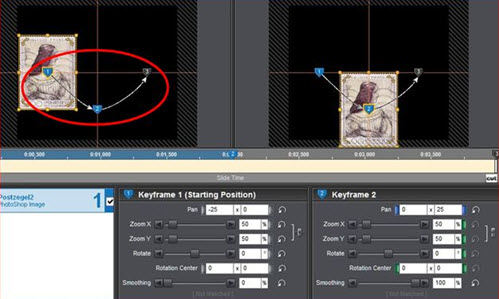
If you use a motion effect it is easier to see how this will work.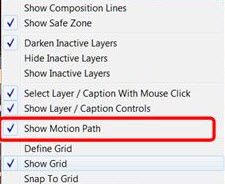
This can be displayed on the monitor. Right click and select [Show Motion Path] from the popup menu to show the motion path.
In the [Smoothing] option, you also have a slider that ranges from 0 to 100. This allows you to specify the movement between 2 points “diametrically” or in a “curved” fashion. 0 is completely legal and 100 is the maximum curvature. This effect can only be seen if you have multiple [keyframes]. In the image below an example is displayed.
Motion speed

The speed of the motion is adjustable. If you click the button, you will get 4 options: [Linear], [Smooth], [Accelerate] and [Decelerate].
Linear:
The entire motion takes place at a constant speed.

Smooth:
The motion accelerates gently to a climax and then slows down.
Accelerate:
Here the motion is gently increased to a climax and is retained.
Decelerate:
The motion is started evenly and is then delayed uniformly.
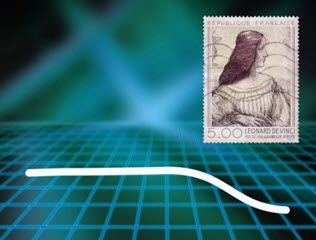
Phew 46: Keyframes – stamps
Now we consider an example with [keyframes] and movements.
New show
- Create a new show titled “Phew 46_Postage stamps”. Click [File]> [New Show] change the [Show Title], and retain the [Aspect Ratio] at 4:3. Click [Create].
Photo in Show
- Select the photo, “Book”, from Lesson 46. Drag it to the slide list.
Adjusting the Slide duration and without transitions
- We set the slide duration to 6 seconds and we do not add any transitions by setting the time to 0.
Zooming and adjusting layers
- Double-click the slide and select [Layers]> [Layer Settings] or click [Layers] button on the toolbar. Set the [Zoom] at 120% and under [Layers]> [Editing] set the [Opacity], which is translucent, at 50%.
Adding a background
- We’ll add a background with a gradient color. Select [Slide]> [Background], select [Background Type] and select the radio button, [Gradient]. Click [Edit Gradient]. In the popup menu, [Create Gradient], select the [Pastels] option in [Presets] and select the [Linear] option in [Type]. Let’s select the colors from the 1st row. Click [OK] and then close this window. Click on [OK] again to close the [Slide Options] window.
Additional layers
- Now we need to add the stamps. Select “Stamp 1, 2 and 3” and drag them to our slide as layers.
Adjusting and positioning Layers
- We now place these stamps in the right positions.
In the toolbar, click [Layers] and select [Layer Settings].
[Stamp 1]: [Zoom] = 40%, [Position] = -33 x 22
[Stamp 2]: [Zoom] = 60%, [Position] = 0 x 0
[Stamp 3]: [Zoom] = 50%, [Position] = 34 x -17
We also provide all the stamps with a Dark shadow. In the [Layers]> [Editing] tab, de-select [Drop Shadow] and select the [Color] Black and set the [Opacity] to 100%.
Moving Layers
- We are going to apply the various motion effects that we have described in this lesson. We let [Stamp 1] slide in a uniform manner. Select [Effects]> [Motion Effects], set the [Pan] for [Keyframe 1] to -63 x 22 and [Keyframe 2] to -33 x 22, and in the [Motion Speed] section set [Pan] = Linear. For [Stamp 2], we zoom out with an acceleration. Select this layer and set [Zoom X] or [Y] of [Keyframe 1], from 0% to [Keyframe 2],at 60%. The chain is closed so that the proportions are present. In the [Motion speed] section, we set [Zoom X] to Accelerate. For [Stamp 3], we run it smoothly and then cause a delay. Select this layer and set [Rotate] of [Keyframe 1], to -360 °, and [Keyframe 2], to 360 °. In the [Motion speed] section, we select [Rotation] = Decelerate.
Setting Layer Transitions
- So, now we can stop this exercise, but you’ll see that when you play it, all movements are almost invisible after the final score. We are going to make it a little more complicated with the use of [Keyframes] one second into the final score. We have already gine over the method. Just copy the slide and copy the final score to the new slide. Adding [Keyframes] is also an option. We add the [Keyframe] at a time of 5 seconds. Select the layer, [Book], add a [Keyframe], eg. by double clicking on the blue bar at the 5 seconds indicator. We really want this over in 5 seconds. We do this by right clicking and then selecting [Set Time for this Keyframe] and in the following dialog, under [Keyframe Time] we enter 5.
- We do the same thing for the layers with the stamps so we that we have a [Keyframe] at 5 seconds in all layers.
- Now the final score comes to [Keyframe 3], from [Keyframe 2] for all layers. This then freezes the keyframe for 1 second. Fortunately, this is done at a time, and need not be repeated for each layer. Be careful to work with the right keyframes. In this case, it was [Keyframes 2] and [3].
- Click on the button
 [Copy Motion Effects].
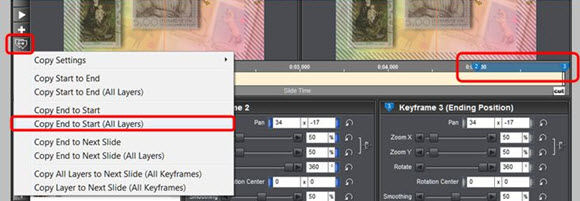
Select [Copy End to Start (All Layers)]. Thus the final position of [Keyframe 3] is copied to [Keyframe 2] for all layers.
Saving the show
- Save this project now. Click [File]> [Save As] and select the correct folder using the explorer, and change the [Name] if necessary. Click [Save].


