There can be almost no Show without text and therefore we will discuss text extensively in this lesson.
New show
- Create a new show titled “Show 4_Vintagecars” by clicking [File]- New Show, changing the title in the Show Title box of the popup menu to “Show 4_Vintagecars” and retaining the aspect ratio as 4:3. Then click [Create].
- We select “Lesson 04” from the built-in explorer. We select all the photos and drag the selection to the slide list.
Title slides
- Before and after photos, we add a title slide. Select the first photo, right click and select Insert- Title Slide (Alt + T). This opens the “Slide Options” window and in the (Captions) text box enter “Vintage cars” and then click [OK]. Place the cursor after the last slide on the slide list, right click and again select Insert- Title Slide. In the text area of the popup menu, “Slide Options” enter “the good old days” and close the window by clicking the [OK] button.
Enter the same transitions
- We now use the same transition for the entire show. Select the first slide, and then press Ctrl + A, which lets you select all of them. Click on the transition time and set it to 2 seconds. Click on a transition. This opens the popup menu with the list of transitions.
From this, select the transition, “Squares Out – Flying Away” from the “Blocks” folder and then click [Apply].
Entering texts and beautification
- On each slide we enter text and edit it.
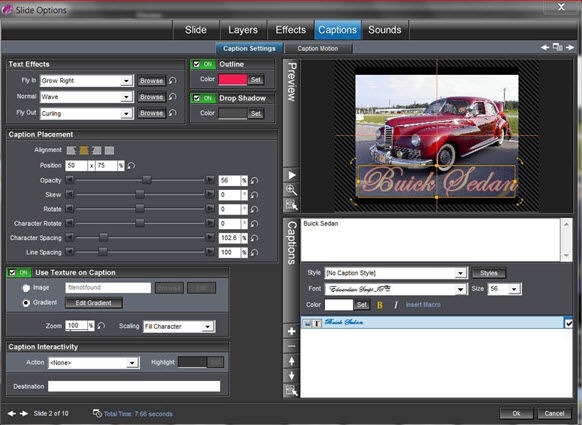
Double click on the 1st picture in the film band. On the new window, “Slide Options” under the [Captions] tab, we have 2 other tabs: [Caption Settings] and [Caption Motion].
[Caption Settings] Tab
Let’s briefly sum up what can be adjusted.
Furthermore, in the exercise, we apply a part of it.
Captions
- Style: There are a number of styles available
- Font: You can select a font from the ones available on your PC.
- Size: This determines the size of each character
- Color: With the help of the color wheel, you can select a color
- B: Indicates Bold text
- I: Displays the text in italics
- Toggle Global state: This button either displays the caption on this particular slide/on all slides: It depends on whether you click this button or not
- Caption Above / Below transition: Clicking this displays the text above or below the transition.
- Hide / show caption: This either shows or hides the text depending on whether it is selected or not.
Text Effects:
- Fly In: This is used to specify how the text should enter the slide
- Normal: This is used to specify how the text is to be displayed during the slide duration
- Fly Out: This is used to specify how the text should disappear after the required duration
Caption placement
- Alignment: determines the alignment which can either be left, center, right or filled
- Position: determines the location of the text
- Opacity: determines the degree of transparency
- Skew: Determines the angle at which the letters in the word are to be displayed
- Rotate: This determines the rotation of the caption
- Character Rotate: This determines the rotation of each character within the text
- Character spacing: You can use this to adjust the space between the letters
- Line spacing: You can use this to specify the space between lines
Outline
- This is used to create a frame around the letters whose color can be selected from the color wheel.
Drop Shadow
- This is used to insert a shadow effect for the text and the color can be specified using the color wheel.
Use Texture On Caption
The letters of the text can be beautified by specifying a texture.
- Image: You can use an image as a texture
- Gradient: You can also use a gradient as texture
- Zoom: You can zoom in on the texture
- Scaling: The scale can be changed
- Fill Character: This is used to scale with respect to the characters
- Fill caption: This is used to scale with respect to the text
- Fill frame: This is used to scale with respect to the slide
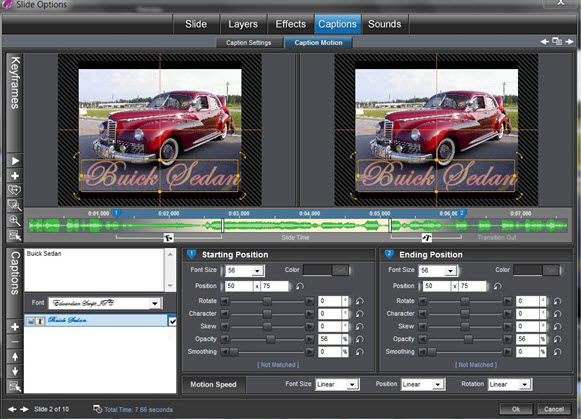
[Caption Motion] Tab
Again, we briefly summarize what all can be adjusted:
Starting and Ending Position (Start and End Position)
- Font size: Allows you change the font size
- Color: Allows you to change the color
- Position: Allows you to shift the text’s position
- Rotate: Allows you to rotate the text
- Character: Allows you to rotate the letters in the text individually
- Skew: Allows you to rotate all the letters in the text
- Opacity: Allows you to specify the degree of transparency
- Smoothing: Allows you to smoothen the text
- Motion Speed: This is the speed of the movement of the text
The various photographs can be edited by using the previous parameters of the texts with different shapes and forms and movements. You can have your own options but here we specify the settings of the parameters used in lesson 4.
Photo 1
In th [Caption Settings] tab
- caption = Buick Sedan
- font = Edwardian Script JTC
- size = 56
- color = white
- bold= selected
- Text Effects
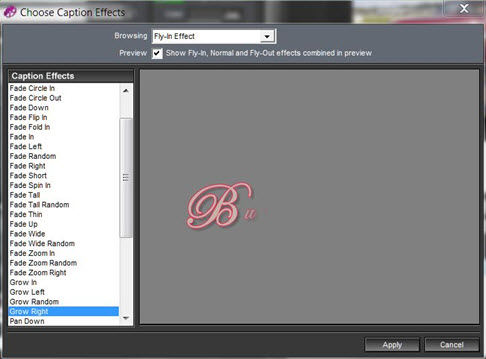
- When you click on the [Browse] button you get the above menu.
You can select and use one of the effects from it.- fly in = grow right
- normal = wave
- fly out = curling
- Outline: selected and in red
- Drop shadow: selected and in gray
- Caption Placement
- alignment = center
- positioning = 50 x 75
- opacity = 56
- Character spacing = 102
- Use Texture on Caption: selected
- Gradient: This radio button allows you
- to apply a gradient to the selected text.
The [Edit Gradient] button displays the following window
- to apply a gradient to the selected text.
- Gradient: This radio button allows you
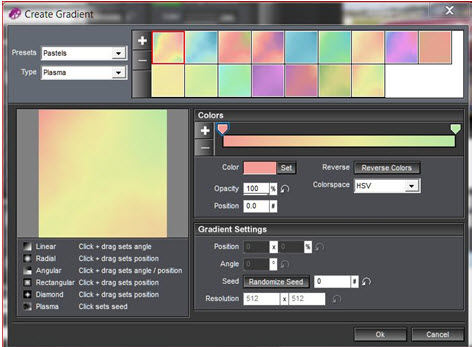
We select Pastels and Plasma and the 1st option in the list.
Photo 2
- in the [Caption Settings] tab
- captions = Cadillac
- font = Edwardian Script JTC
- size = 56
- color = white
- bold = selected
- Text Effects
- Fly in = fade fold in
- normal = shake
- fly out = elastic left
- Outline: selected and in red
- Drop shadow: selected and in gray
- Caption Placement
- alignment = center
- position = 48 x 77.22
- opacity = 100, which is the default setting, and is set by simply clicking on the arrow, reset
- Skew = 60
- character rotate = -16.2
- Character spacing: 152.2
- Use Texture on Caption: de-selected
Photo 3
- in the [Caption Settings] tab
- captions = Chevrolet Belair
- font = curlz MT
- size = 48
- color = red
- bold = selected
- Text Effects
- fly in = pan down
- normal = horizontal spin
- fly out = elastic right
- Outline: selected and in white
- Drop shadow: selected and in gray
- Caption Placement
- alignment = center
- positioning = 50 x 50
- Skew = 60
- character rotate = -16.2
- Character spacing: 152.2
- Use Texture on Caption: de-selected
Photo 4
- in the [Caption Settings] tab
- captions = Corvette
- font = franklin gothic demi
- size = 48
- color = light green
- bold = selected
- Text Effects
- fly in = pan down
- normal = horizontal spin
- fly out = elastic right
- Outline: selected and in red
- Drop shadow: selected and in gray
- Caption Placement
- alignment = center
- positioning = 50 x 75
- skew = -78.5
- Use Texture on Caption: de-selected
Photo 5
- in the [Caption Settings] tab
- captions = Ford
- font = franklin gothic demi
- size = 48
- color = light green
- bold = selected
- Text Effects
- fly in = pan down
- normal = horizontal spin
- fly out = elastic right
- Outline: selected and in red
- Drop shadow: selected and in gray
- Caption Placement
- alignment = center
- skew = -78.5
- Use Texture on Caption: de-selected
In [Caption Motion], this text is to be moved from the top left to the bottom right from start to end, i.e the positions are 30 x 15, 74 x 78.
Photo 6
- in the [Caption Settings] tab
- captions = Ford Thunderbird
- font = franklin gothic demi
- size = 48
- color = light green
- bold = selected
- Text Effects
- fly in = none
- normal = galactic scroll
- fly out = none
- Outline: selected and in red
- Drop shadow: selected and in gray
- Caption Placement
- alignment = center
- positioning = 50 x 50
- Use Texture on Caption: de-selected
Photo 7
- in the [Caption Settings] tab
- captions = Packard Sedan
- font = french serial MJ
- size = 48
- color = light green
- bold = selected
- Text Effects
- fly in = fade circle out
- normal = rotate
- fly out = fade flip out
- Outline: selected and in red
- Drop shadow: selected and in gray
- Caption Placement
- alignment = center
- Use Texture on Caption: de-selected
- in [Caption Motion] the coordinates of the start and end positions are 79 x 50 to 50 x 16 respectively
Photo 8
- in the [Caption Settings] tab
- captions = Rolls Royce
- font = Garamond
- size = 18
- color = blue
- bold = selected
- Text Effects
- fly in = fade circle out
- normal = wave
- fly out = fade flip out
- Outline: selected and in red
- Drop shadow: selected and in gray
- Caption Placement
- alignment = center
- Use Texture on Caption: de-selected
- in the [Caption Motion] tab
- fonts: 18 to 48
- positions: 50 x 12 to 50 x 75
Music introduction
We will also bring music into the show and synchronize both the show and the music. In the folder “My God 04” select the mp3, “Jive Bunny & The Mastermixers_Rock And Roll Party Mix” and drag it to the soundtrack below. Double click on the soundtrack and this opens the popup menu “Show Options” with the [Music] tab which has the [Show Soundtrack] tab. Click the [Sync Slide to Audio] option. In this case we set the settings as shown in the figure below.
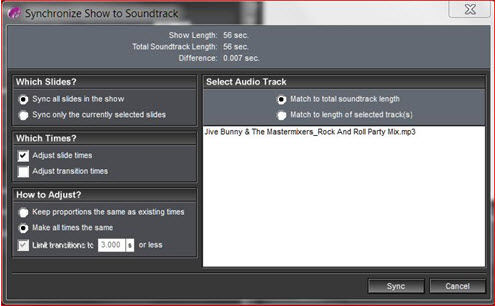
Here only the durations of the slides adjusted. The transitions are preserved. Click [Sync] and ProShow does the rest. To close the “Show Options” window, click [Done].
Saving a Show
To save this show we click [File]- Save As. With the explorer, we select the appropriate folder. Change the File Name to “Show 4_Vintagecars” and click [Save].
EXE with direct start-up
The end product is in EXE format, without buttons. Click on the [Create Output] button on the toolbar at the top . In the popup menu, select [PC Executable] and then select the [Menu] option.
We again select “no menus” as the theme. In the Menu Layout box we select an Aspect ration of 4:3 (TV).
Click [Create] and place the show in the correct folder on your PC and give it the proper name “Lesson4_Vintagecars”. Then click on [Save]. The movie is created.
Then you’re asked whether you want to view the movie, click [Yes], and this show will begin.


