The important part in this lesson is learning how to deal with motion pictures.
Creating a new show
- Create a new show titled “Show3_Explorer of the Seas” by clicking File- New Show, changing the title in the popup menu to “Show3_Explorer of the Seas”, and retaining the aspect ratio at 4:3. Then click on “Create”.
- We select “Lesson 03” from the built-in explorer. We select all the required photos and drag the selection to the slide list.
Adding a Title slide
- We add a title slide before and after pictures. Select the first photo, right click and select Insert- Title Slide (Alt + T). This open the “Slide Options” window and in the text box “Captions” enter “Our Cruise” and then click “OK”. Place the cursor after the last slide in the slide list, right click and again select Insert- Title Slide. In the text area of the popup menu, “Slide Options” enter “It was a nice holiday” and close the window by clicking the “OK” button.
Random transitions
- We are fine with any transitions so we let them be selected by the application itself. Select all the slides
- (Ctrl + A) right click and select Randomize> Randomize Transitions.
Moving Photos
- One of the nice features of ProShow Producer is the option of moving pictures on the slides and the like. Select the first photo in the slide list. Double click on it and then you will get the “Slide Options” window. This has several tabs: [Slide], [Layers] [Effects] [Captions] and [Sounds]. In this exercise we will dicuss the [Effects] tab and the [Motion Effects] and [Adjustments Effects] options in detail.
These are used to move slides. This window is divided into 2 sections: the starting position and ending position. This will allow you to select a certain position on each screen and ProShow completes the form so that we obtain a smooth motion.
Consider the [Motion Effects] section.
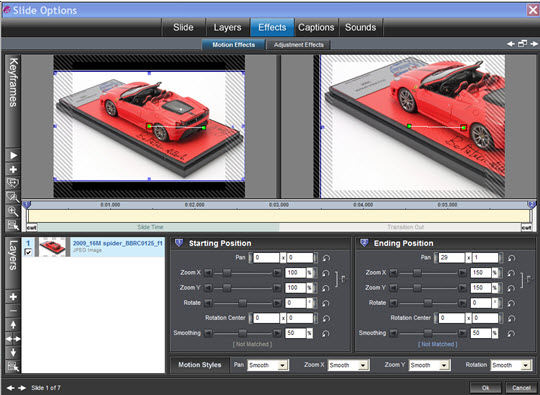
In the bottom half you have some options that you can use to control the motion:
- Pan: This allows you to view the picture left, right, up or down
- Zoom: Allows you to zoom in or out
- Rotate: Allows you to rotate the photo about the Rotation Center, which you can specify
- Smoothing: Allows you to slow down or speed up the motion.
Below this you have the Motion Styles option. There are 4 of them.
- Smooth: the motion is gentle
- Linear: the motion is rectilinear
- Accelerate: the motion begins slowly and then speeds up
- Decelerate: the motion begins at a fast rate and then slows down.
Consider the [Adjustments Effects] section.
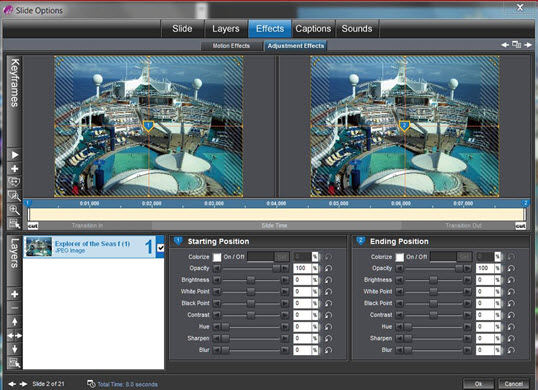
Here also you have options for moving the starting and / or ending position.
- Colorize: If you check this box you can select a color from a color wheel and the photo will get this color. For example: to identify Sepia, the color wheel uses the following values
HEX or RGB = 188/170/138 = BCAA8A - Opacity: Used to make your slides more or less transparent
- Brightness: Used to control the brightness
- White Point: Determines the whitest point on the slide and allows it to adapt accordingly
- Black Point: Determines the darkest point on the slide and allows it to adapt accordingly
- Contrast: Used to specify more or less contrast. Allows you to enhance or reduce this to specify the contrast between light and dark areas
- Hue: Specifies a color tint
- Sharpen: Allows you to specify the amount of sharpening
- Blur: Allows you to specify the amount of blurring
And, of course, you can have different combinations with all these different options
Tips:
Reset button
- Reset button:
 sets the option back to its default value.
Adjusting Slide after slide
- You can make adjustments slide by slide by clicking the [OK] button but to the buttom left corner you also have this :
 . You can select the previous or next slide and then customize it. So, you can go through all your slides and customize them, if you wish, before you close the window.
Preview
- Inthis window, you can preview your show before continuing. Click on this arrow on the bar on the left
 and you can see the preview on the left.
Introducing Music
- Now we bring the music to the show and make the show more entertaining. In the folder “My God 03” select the “Explorer of the Seas” mp3 and drag it to the Soundtrack. Double click on the soundtrack and you get the popup menu, “Show Options” with the “Music” tab open. Click the [Sync Slide to Audio] button. In this case we need all the slides to be synchronized with the music, so we select the “Sync all slides in the show” radio button, and to modify the slide durations and transitions, select the “Adjust slide times” and “Adjust transition times” check boxes, and we also keep the proportions the same, so we select the “Keep proportions the same as existing times” check box. Click [Sync] and ProShow does the rest. To close the “Show Options” window, click [Done].
Saving a Show
- To save this show we click [File]- Save As. Using the explorer, we select the appropriate folder. Change the File Name to “Show3_Explorer of the Seas” and click [Save].
EXE to a button
The end product is in EXE format, with a menu.
Click on the [Create Output] button on the toolbar at the top.
In the popup menu, select [PC Executable] and then select the [Menu] option.
[Menu] tab
- Here we can select a theme for our slide. It will be placed as a background.
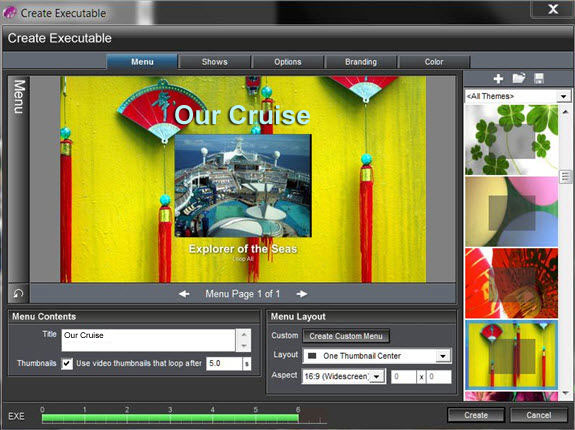
In the Menu Contents section enter the Title “Our Cruise”.
Thumbnails: When we check the box “Use video thumbnails That loop after x seconds”, the button in the menu will be displayed as a short video. Professionally we select the “One Thumbnail Center” Layout (a button) and we select the Aspect ratio as 16:9 (widescreen) in the dropdown menu.
[Shows] tab
- Consider the [Shows] tab.
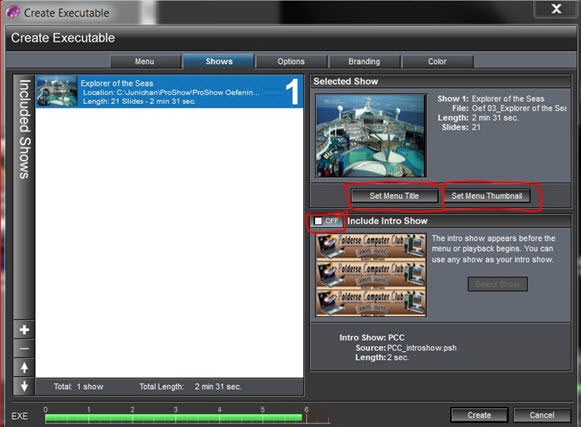
Include Intro Show
- For now we un-check the “Include Intro Show” check box. This is used prior to your show to display a short commercial about ProShow Producer.
Set Menu Title
- Clicking [Set Menu Title] allows you to enter or change the text that will be placed under the menu button.
Set Menu Thumbnail
- With the [Set Menu Thumbnail] button you can set the content of the menu button.
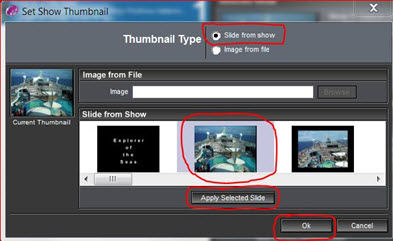
We have 2 radio buttons in the dialog that opens and by selecting either of them, you can
- select a slide from the show as the thumbnail
- or select a photo from one of your folders using the “Image from file” option.
- If you select the first option, you can use the slider to browse through the slides and pick out one. Click on the [Apply Selected Slide] button to use this slide as the Menu button. For this lesson, you can see what I selected in the above image.
- Click on [Create] and place the show in the correct folder on your PC and give it the proper name “Lesson3_Explorer of the Seas”. Then click on [Save]. The movie is thus created.
Then you’re asked whether you want to preview the movie, and if you click [Yes] this is the result.
Click to see the entire movie.
Points to remember:
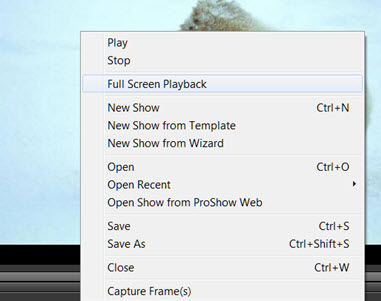
- Preview on the big screen:
- If you want the “preview” to be adapted to your PC’s screen size, right click in the preview window and select the “Full Screen Playback” option. You can go back to the smaller view by de-selecting it.
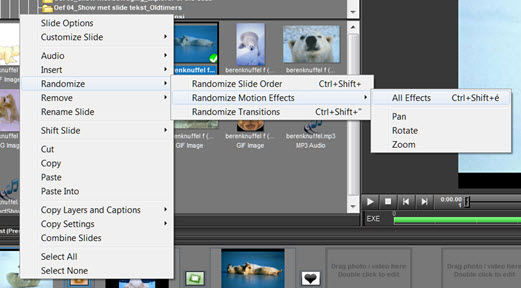
- Randomize effects:
- If you want to apply an effect, immediately, on all the slides you can do it in the following manner. Select all the slides on the slide list, and right click and select the [Randomize] option in the pop-up menu and then select [Randomize Motion Effects]. Then you can choose from the following options:
- All Effects: ProShow selects a random effect from the list of effects.
- Pan: All slides have a “pan” movement.
- Rotate: All slides are rotated in different directions.
- Zoom: All slides are zoomed in