Introduction:
Can you imagine how a stencil works You take a cardboard and cut out the letters or a shape and place it on a background. Then you paint it. If you remove the stencil, the letters or the shape is found on this background. The stencil is an example of a mask.

It is simply something that is partially covered. Here’s how it works in the traditional sense. Think of it as a mask used during a carnival. In the digital world the concept is the same, but here there are more options resulting in more effects that can be created.
A mask is a special layer
In ProShow is a mask is just a special layer. Each layer is used as a mask layer as long as you do something creative to join layers. You’ll need at least 2 layers to use one of them as a mask.
Types of masks
Proshow Producer has 2 types of mask. These are the alpha (transparancy) type and the intensity (grayscale) type. Without going into too much detail here is a brief description of these types:
Type 1 Alpha (transparancy):
If you are using a mask you need to decide what is being covered. Here, the transparent part of the mask layer and will cover the underlying layer and only the “solid” part will be shown. This can be compared to what is cut in the cardboard example. It looks much like what we saw earlier with borders, where the inner part is transparent. But the mask itself is always invisible and you do not see it displayed in a show, where the borders are not meant to disappear but to be included in the final product.
Type 2 Intensity (grayscale):
Here, the effect is dependent on the darker and lighter areas of the layer that you are using as a mask. It is best to use this while working with a black and white photo. The portion under the lighter parts is displayed and the portion under the darker parts is covered. In English you have the saying:
“Dark conceals while light Reveals” (Dark conceals, light reveals).
Practical examples
Before you work with masks in ProShow Producer, you need to know where the controls are. It is not that if you have a picture or something similar with the word Mask, ProShow recognizes it as a mask. No, you need to place a mask.
Mask type: Intensity (Grayscale)
New show
- Create a new show titled “Show 39_Masks”. Click [File]> [New Show] change the [Show Title], and retain the [Aspect Ratio] at 4:3. Click [Create].
Example 1
Inserting Layers
- Select “Background_03” and the “Young Lady” from Lesson 39 and drag them onto the slide list but as layers.
Scaling, zooming and changing positions
- Double-click the slide and select [Layers]> [Layer Settings]. Select the layer [Background_03] and set the [Scaling] to [Fill Frame]. Then select the layer, [Young Lady], and set the [Scaling] to [Fill Frame] here. Place the [Zoom] slider at 185 and the [Position] = 7 x -27.
Checking the order of the layers:
- We use the [Young Lady] as a mask layer. Therefore, this layer should be the topmost layer. Check if this is so, otherwise you can just drag it upwards.
Mask
- On the left there is a special box, [Masking Layer]. To use a layer as a mask layer select the checkbox.

so that [OFF] is changed to [ON].
You see the picture in the preview window is colored differently. In the layers will notice that the layer, [Young Lady] has been given the additional name, [Mask Layer] and that the layer [Background_03] is shifted slightly to the right. This is now locked in place with the upper layer.

- Click [OK] to close this window and then you can see on the slide list that the colors of the background are pushed onto the layer, [Young Lady]. The dark parts are not or almost not changed and the lighter parts are adjusted quite well.

Example 2
Inserting and adapting layers
- Here’s another example of a mask. Select “Background_02” from Lesson 39. Drag it to the 2nd slide and set the [Scaling] to [Fill frame]. You can do this by right clicking, and selecting [Customize Slide]> [Scale Slide Image]> [Fill Frame] from the popup menu.
Inserting and adapting extra layers
- Select the photo, “Bride”, and drag it on the 2nd slide but as an extra layer. You can also set the [Scaling] to [Fill frame].
Applying a mask
- We are going to use layer, [Bride], as a mask layer. Double-click the slide and in [Layer]> [Layer Settings] select the [Masking Layer] checkbox. We see the changes as indicated above. Click [OK] and you will see results by where this is used as a mask. Now it looks as if the whole picture is a shadow.
Mask types
Now let’s talk about the various “Mask types.” In the [Masking Layer] section, there is a field called [Mask type] where you can select the type of mask that is to be used.
With the dropdown menu you can select from 2 types, namely Intensity (grayscale) and Alpha (Transparency). In the two previous examples, we have used [Intensity (Grayscale)] masks. The use of this type of mask usually gives a bleached picture. The “push through” characteristic is dependent on the light and dark areas in the mask.

Mask Type: Transparency
Example 3
Inserting and adapting layers
- Select the “Background_01” and drag it to slide 3. The [Scaling] is set to [Fill Frame].
- Select the “Snowflake” layer and drag it to slide 3 as an additional layer.
Applying the mask
- Double-click the slide 3 and in [Layer]> [Layer Settings] we make the layer, [Snowflake], a mask. In other words, we select the [Masking Layer] checkbox. You will see that the [Mask Type] is automatically changed to [Alpha (Transparency)]. ProShow Producer recognizes certain extensions as “alpha” types, including PSD, PNG, TIFF.
- Click [OK] and close the window. The result shows that all of the underlying layers which are below the [Snowflake] are displayed and all the rest of them are blocked. So you see the big difference with the other type which was used in Examples 1 and 2.

Example 4
Inserting Layers
- Here’s another example of the mask type “Transparency”. Select “Frame”, “Flowers” and Background_01 “and drag it to slide 4 as a layer.
White background
- Double-click the slide 4 and in [Slide]> [Background] select white as the background color.
Scaling and zooming Layers
- Select [Layer]> [Layer Settings] and for all the layers set the [Scaling] to [Fill Frame].
- For the layer, [Flowers], we set the [Zoom] at 70%.
- For the layer [Background_01] we set the [Zoom] at 50%.
Organizing Layers
- Now we arrange the layers. Above the layer [Background_01] we place the layer, [Flowers].
Mask
- The layer [Background_01] is used as a mask layer. Select it and select the [Masking Layer] checkbox. We select Alpha (Transparency) as the [Mask type]. To use this effect perfectly, all the way, we should invert the selection. Just click on the [Invert] button. You will also see that the layer [Flowers] is not part of the mask. This is how we want it to be. Close this window by clicking the [OK] button and see the result.
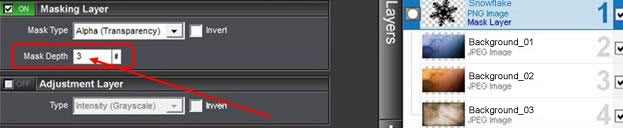
Mask depth:
Now we still have the [Mask depth] (mask depth) option to be discussed. You can link multiple layers using a single mask layer.
Example 5
Inserting Layers
- Select “Background_01, 02 & 03” and “Snowflake” and drag them as layers on slide 5.
Organizing Layers
- Double-click the slide and select [Layers]> [Layer Settings]. We are going to use the layer, [Snowflake], as a mask. Before this we need to arrange the layers. Place the layers, [Achtergrond_01] than [02] and also [03] above the layer, [Snowflake].
Mask
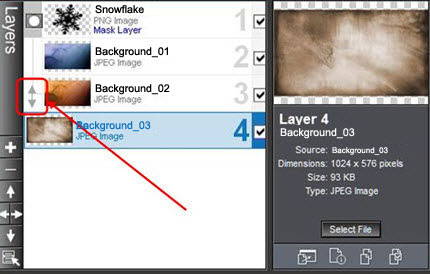
- Select [Layer Mask] to. You can see that only one layer is linked to the mask layer.
Linking Multiple Layers to a mask
3 Options
- Now there are 3 ways that other layers can also be linked to the mask layer.
- Select the layer, [Background_02] and use the right arrow to link a layer. With the left arrow you can disconnect layers.
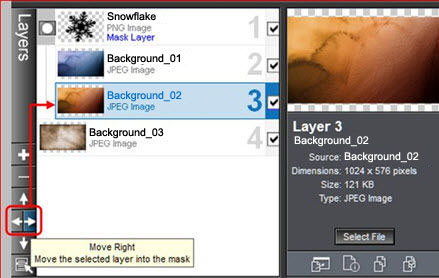
- Select the layer [Background_02] and using the right arrow, you can link it to the mask layer. With the left arrow you can disconnect it.
- In the [Masking Layer] section you have the [Mask Depth] option. Here you enter the number (eg type 3) of layers that are connected to the mask.
Layering
- To highlight this effect we place the layer, [Background_01] at [Position] = -45 x -35 and place the layer [Background_02] at [Position] = 55 x 35. Close this window by clicking [OK] and you can see the result.

Saving the Show
- Select [File]> [Save As], select the appropriate folder using the explorer and change the [Name] if necessary. Then click on [Save].


