To further develop your expertise on keyframing, in this lesson, we will work with a combination of movements and effects. Here we have a stack of photos that flies in using keyframes, and has special effects to simulate the flash of a camera, and as the icing on the cake, we also add a camera click for each photo.
New show
- Create a new show titled “Show 51_Photostack”. Click [File]> [New Show] change the [Show Title], and the [Aspect Ratio] is retained at 4:3. Click [Create].
Photos as layers
- We select the 4 photos from Lesson 51 and drag them as layers in a slide.
Adjusting the Slide and transition durations
- The slide time is set to 7 sec and the transition time is set to 0 sec.
Organizing Layers
- The layers are ordered by name, photo1, photo2 … Click [Layers] button on the toolbar and place the pictures in the correct order.
Enlarging Photos
- We set the [Zoom] of all the photos to 60%. To do this for [Layer 1], we right-click on the [Zoom] box and select [Copy zoom to all layers on this slide].
Rotating and positioning Photos
- Now we arrange the pictures in such a way that they look as if we are throwing them one by one on a table. To do this, select [Effects]> [Motion Effects].
The picture at the bottom is thrown first and so on. We now apply the following settings to [Keyframe1]:
for [Photo 4] we set [Rotate] to 8 and [Pan] = 3 x -13
for [Photo3] we set [Rotate] to -3 and [Pan] = -9 x -6
for [Photo2] we set [Rotate] to 0 (unchanged) and [Pan] = 10 x 2
for [Photo1] we set [Rotate] to 5 and [Pan] = 14 x 12.
Copying the Keyframe
- These settings are copied in their entirety to [Keyframe 2]. Click [Copy Motion Effects] and select [Copy Start to End (All layers)].
Additional keyframe per layer
Until now there has been little movement in our photos. We’re going to change now. We want the photos to appear individually and in succession. For this, an extra [Keyframe] is needed. Select [Photo1] and click the [+] icon on this layer in the middle, to create a [Keyframe]. We do this for the other layers. The position of this additional key frame is not important because we are going to customize it further.
Setting Keyframe 1 per layer
Zooming, rotating and placing Photo 4
- We want to throw [Picture 4], on the table, clockwise, from the top left corner to its position. In [Keyframe 1], set the [Zoom] = 100%, [Rotate] = -8 and [Pan] = -110 x -89.
Automatic adjustment off
- But what do we see now? [Keyframe 2] has also been modified and this is annoying. This was not intended, because we want [Keyframe 2] to remains as it is. We want to customize the default values that are automatically entered by ProShow. This can be done only when you have intermediate keyframes, and not for the 1st or the last. For each option that you can change, you will see a green or blue bar.
Blue: This is your value for this option.
Green: This is the automatic value for this option.

So, to get back the values of [Keyframe 2], you must click on each option that was changed. It will be displayed in blue and our values are once again entered.
Zooming, rotating and placing Photo 3
- [Photo3] is also thrown on the table but in an anti-clockwise fashion, from the bottom right corner to its position. In [Keyframe 1], set the [Zoom] = 100%, [Rotate] = 3 and [Pan] = 107 x 70. Here, also, [Keyframe 2] is changed. Do as mentioned above, and click the bars to get back the original values.
Zooming, rotating and placing Photo 2
- [Photo2] is to come in from the bottom left corner, and we specify the following settings for it: [Keyframe 1]: [Zoom] = 100%, [Rotate] = -5 and [Pan] = -100 x 42. Once again [Keyframe 2] is changed. Perform the steps as mentioned above.
Zooming, rotating and placing Photo 1
- Finally, [Photo1] should come in from the top right corner, so we use the following settings for [Keyframe 1]: [Zoom] = 100%, [Rotate] = -5 and [Pan] = 99 x -55. Once again it is the same story for [Keyframe 2].
Adjusting the Keyframe durations
- Now we want it brought in more quickly, for example in 0.5 sec and also the pictures are to be displayed in a row on the stack. This is achieved by dragging keyframes per photo We start with the bottom picture first.
For [Photo 4], set [Keyframe 2] to 1 sec and [Keyframe 1] to 0.5 sec.
For [Photo3], set [Keyframe 2] to 2.5 sec and [Keyframe 1] to 2 sec.
For [Photo2], set [Keyframe 2] to 4 sec and [Keyframe 1] to 3.5 sec.
For [Photo1], set [Keyframe 2] to 5.5 sec and [Keyframe 1] to 5 sec.
Additional layers for flash effect
Flash in Photo 4
- Now it’s time to add the flash effect. This can be done by adding an extra layer for each picture, and this lasts as long as the motion effect of the picture itself. Select [Photo 4], right click and select [Add Layer]> [Add Solid Color]. With the color wheel we select white as the color. We check whether this layer is just above [Photo4]. If this is not so, we move this layer.
- To obtain a flash effect, we change the [Opacity]. Select [Effects]> [Adjustment Effects] and set the [Opacity] from 100% to 0% for [Keyframe 2].
- Now we adjust the duration. We will use the same settings as in [Photo 4]. [Keyframe 2] = 1 sec and [Keyframe 1] 0.5sec.
Flash in Photo 3
- For the other 3 photos also we use these extra layers as the flash. Select the flash layer in [Photo 4] and duplicate it. To do this, right click the layer and select [Duplicate Layer]. Move this layer just above [Photo3] and adjust the duration to that used in [Photo3]. Set [Keyframe 2] = 2.5 sec and [Keyframe 1] = 2 sec.
Flash in Photo 2
- We then duplicate this layer and place it on [Photo2]. Set [Keyframe 2] = 4 sec and [Keyframe 1] = 3.5.
Flash in Photo 1
- Finally we duplicate this layer again and the change the duration, [Keyframe 2] = 5.5 sec and [Keyframe 1] = 5 sec. Now close the [Slide Options] window.
Adding a Camera click
- Now, this looks good but we still need to add a camera click. Drag the sound “camera.wav” from Lesson 51, 4 times to the “Soundtrack”.
Click [Timeline] button on the toolbar. Just zoom in on the sound track. This makes it a little easier.
We place the sound on a photo so that it coincides with the flash. You can try this visually.
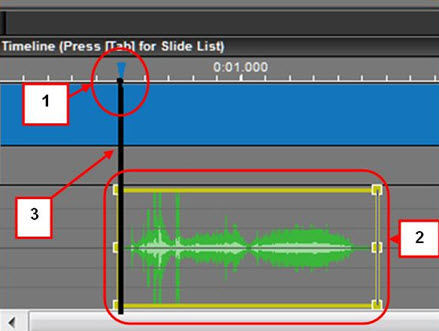
Use the blue arrow (1) and slide it until you start to see the first flash, at about 0.5 sec. Drag the first sound (2) with [Ctrl] key pressed the to the thin line that runs vertically on the film strip from the blue arrow downwards. In the picture above, this line is darkened for information purposes only.
Do the same for the other 3 sounds so that they are placed in their respective places during the flash.
You can also just place the sounds at 0.5sec, 2 sec, 3.5 sec and 5 sec.
These are the times which correspond to the times of [Keyframe 1] of the four pictures. This makes our show complete.
Saving the Show
- Save this project now. Click [File]> [Save As] and select the correct folder in which you want to save this project, using the explorer and change the [Name] if necessary. Click [Save].


