ProShow provides a large number of transitions to choose from when creating a show. But it also allows you to create your own transitions.
Some rules
There are some rules you must know:
- A transition (transition) can be created only on one slide. You can use use multiple layers within the slide.
- The transition time should be zero. The fact is that while creating a transition, it is not allowed to clash with any other transition. If you forget this, ProShow displays the following warning:
Trans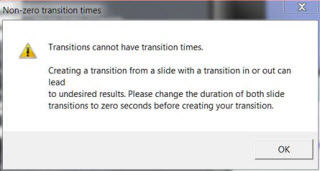 tions cannot transitional times.
Creating a transition from a slide having with a transition in or out, can lead to undesirable results.
Please change the duration of both slide transitions to “zero” seconds before creating your transition.
Here are 2 examples that can inspire you to create a transition.
New show
- Create a new show titled “Show 54_Transitions”. Click [File]> [New Show] change the [Show Title], and retain the [Aspect Ratio] at 4:3. Click [Create].
Example 1:
Creating a blank slide
- Right click on the slide list and select [Insert]> [Blank slide] or use the keyboard shortcut: [Alt] + [I].
Adjusting the Slide duration and transition time
- Set the slide duration to 4 seconds and the transition time to 0 sec (see Rule 2).
2 colored layers
- A transition is always used between 2 slides. In order that we are not confused with what we usually do, what we’re doing now is not important while working with photos. To demonstrate this, we just work with 2 layers of color here. Double-click the slide and select [Layers]> [Layer Settings]. Click the [+] icon and select [Add Solid Color] and use the color wheel to select a color. Create another layer having a different color.
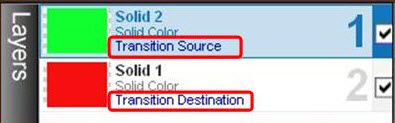
Determining the Source and endpoint
- These 2 layers of color, are given a specific function. For a transition, we have a source (source) and an endpoint (destination). This is because you need to move from one slide to another slide by slide. This feature is assigned to the layers.

Right-click the top layer and select [Use as Transition Layer] and in the following popup menu select [Source Slide]. This is our source. You can also see this in the layer. This is analogous to a feature: [Transition Source].
- Right Click on the 2nd layer also and select [Use as Transition Layer]> [Destination Slide]. This is our end point. This is analogous to the feature, [Transition Destination] on the layer.
Adding an extra layer
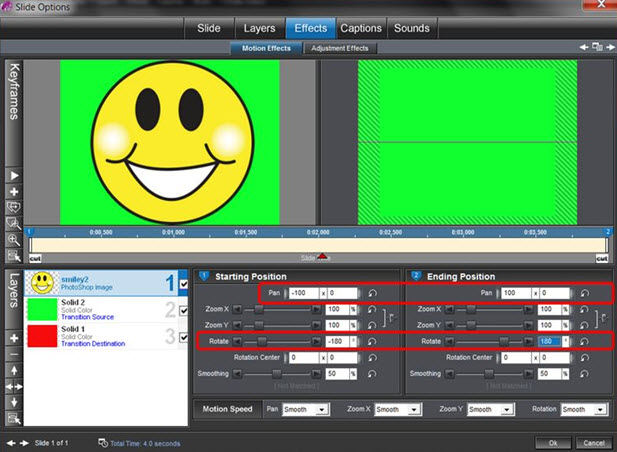
- To move from the source to the endpoint, we use an extra layer. Add “Smiley2.psd” from Lesson 54 as [Layer 1] above the 2 layers of color.
Moving a Smiley
- We move this [Smiley] across the screen. Go to [Effects]> [Motion Effects]. For [Keyframe 1], set [Pan] = -100 x 0 and for [Keyframe 2], set [Pan] = 100 x 0. This scrolls the [Smiley] all over the screen but it does not roll as yet. We will ensure that the [Smiley] rolls from the middle of the screen at an upright position. Before this, set [Rotate] from -180 to 180.
Setting Keyframe2 of layer 2
- Now we need to ensure only that one color layer is replaced by the other. We do this by shifting the 2nd layer [Keyframe 2] to the left, image (1), so that you get the [Smiley] halfway accross the screen, approximately at 2.75 sec.
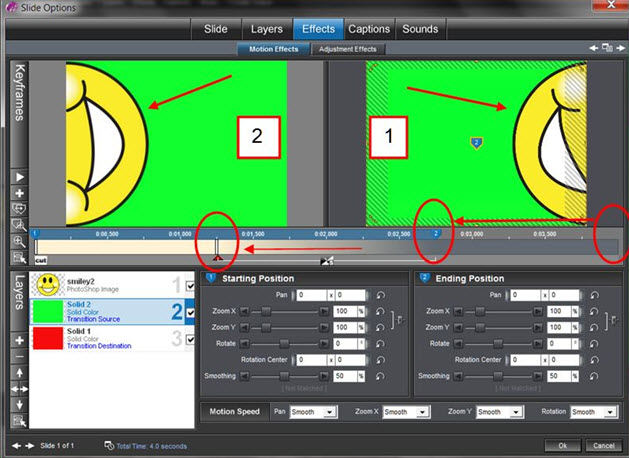
Transition on layers;
- In [Keyframe 2] we select a transition. Click [Cut] and select the transition [Wipe – From Left] for example. This transition moves the [Smiley] to the left so that half of it is displayed, approximately at 1.5 sec, image (2).
Saving the Transition
- Thus our transition is ready. Now we can save it along with the other transitions so that it can be used at a later point of time. Select [Slide]> [Slide Settings]. At the bottom, you will find this dialog:
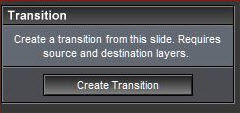
Click the button, [Create Transition] (create transition). Then the following window appears:
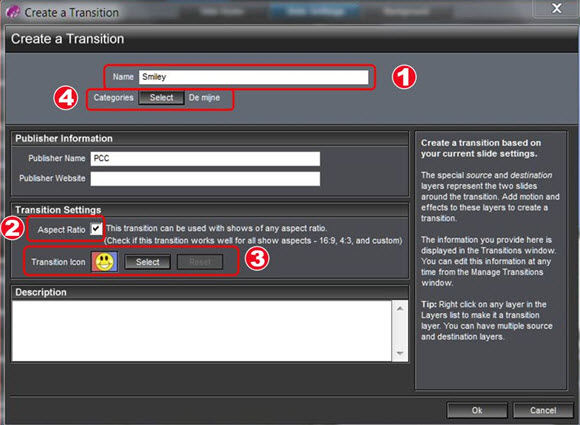
In the [Name] text box (1) enter the name of your transition. The [Aspect Ratio] (2) is selected. Then it works for both narrowband and broadband connections.Using the [Transition Icon] (3) and the [Select] button, you can select a frame that can be used as a thumbnail for your transition. You can save your transition in a separate directory, but here it is called [Categories] (4). Click the [Select] button and you will see this.
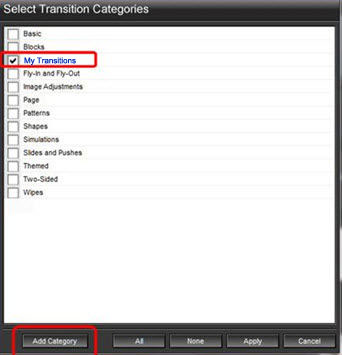
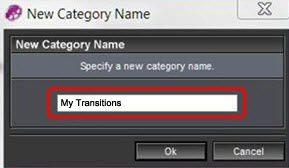
This displays a list of existing categories. You can create one as well. To do that, click on the [Add Category] button. In the windowthat opens, add your own category.
Select the category in which you want to place your transition. You can have more than one. Then click [Apply]. Click on [OK] again and the transition is created. To test whether your transition works, you can use it between 2 photos.
Example 2:
- This transition is created with 2 photos. Here we use pictures instead of layers of color to see the effect of our transition, more clearly. And, as previously stated, the pictures we use actually are of no consequence because they are not saved after the transition is created. It is about the settings and the technique used while saving the transition.
Photos as layers
- Drag “Flower1” and “Flower2” to the slide list as layers.
Adjusting the Slide duration and transition times
- Set the slide duration to 4 seconds and the transition time to 0 sec.
Copying the layer
- Click the [Layers] button on the toolbar. We’re going to copy [Layer 1] 3 times. Right click on this layer and select [Duplicate Layer]. Do this 2 more times.
Determining the Source and endpoint
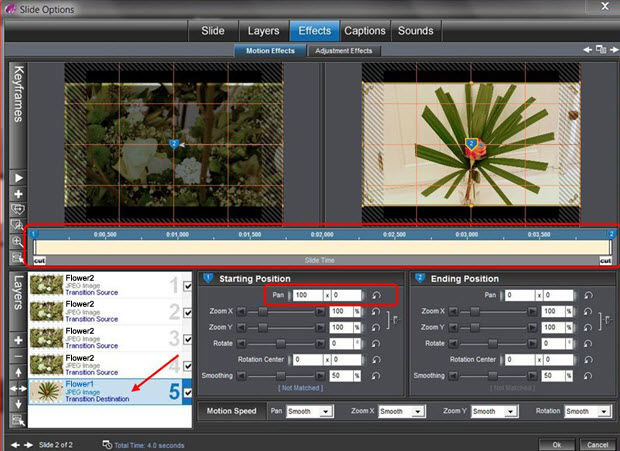
- Now, we assign the source and endpoint. Select the bottom layer, right click and select [Use as Transition Layer] and [Destination Slide]. This is the last point of the transition. But we want to use the source for the first 4 layers. To do so, select a layer, right click and select [Use as Transition Layer] and [Source Slide – All Copies]. This is our starting point.
Converting inactive Layers
- We keep it simple, at first, and only work with 2 layers. So, we make [Layers 2], [3] and [4] inactive.
- We now want [Layer 1] to disappear and [Layer 2] in its place. This effect is obtained by selecting [Effects]> [Motion Effects] and in [Layer 1], setting the [Pan] of [Keyframe 2] at -100 x 0 and in [Layer 5], setting the [Pan] of [Keyframe 1 ] to 100 x 0. We can use all this as a transition. If you want you can even save it.
Creating and placing Active layers
- However, we are going to refine our effect. We want the first layer to be broken into pieces and we also want to make a blur effect. Make the 3 layers active again. For all 3 of them, set the [Pan] of [Keyframe 2] at -100 x 0 as in the upper layer.
Arranging Layers in a stack
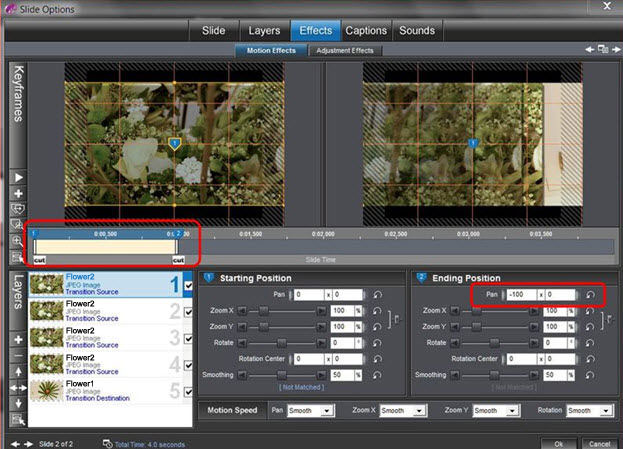
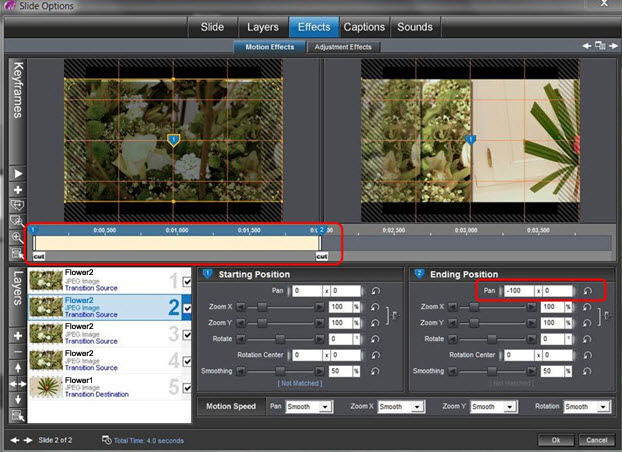
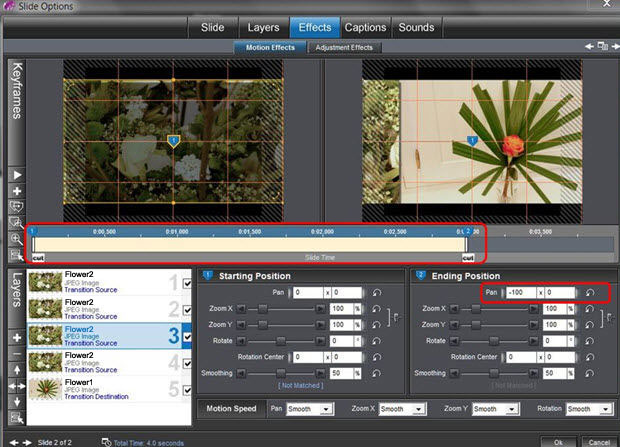
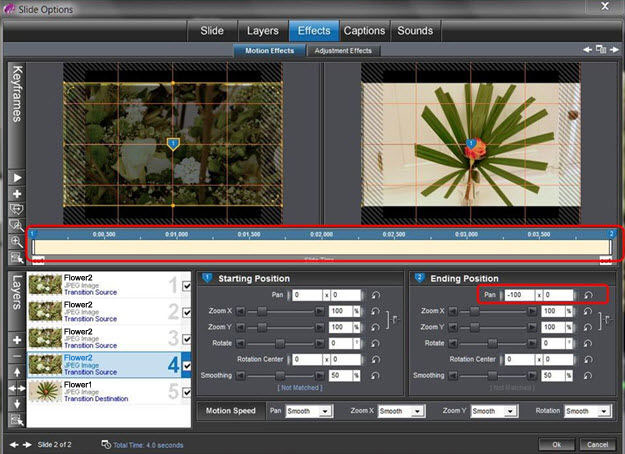
- Now let us arrange these 4 layers like a deck of cards. For this, we adjust the times of the layers. [Layer 4], is not changed. For [Layer 3] we drag [Keyframe 2] to 3 sec. [Keyframe 2] of [Layer 2] is dragged to 2 sec and [Keyframe 2] of [Layer 1] is dragged to 1 sec.
- All these settings can be seen in the following figures.
Layer 1
Layer 2
Layer 3
Layer 4
Layer 5
Shadow
- To add a little depth we place a shadow for our first 4 layers. Select [Layers]> [Editing] and select the [Drop Shadow] checkbox for each layer and use the default values.
Blurring Layers
- The blur effect can be achieved by adjusting the transparency. Select [Layers]> [Editing] and specify the settings as follows: [Layer 1], [Opacity] = 20; [Layer 2], [Opacity] = 40; [Layer 3], [Opacity] = 60.
Saving the Transition
- Thus, our transition is ready. Now we can save it. Select [Slide]> [Slide Settings]. Click the [Create Transition] button. In the [Name] text box, enter the name “4Layers”. Select one of the [Categories]. Click on the [Select] button and select your category. The [Aspect Ratio] is left selected. If you want a photo in the thumbnail, then use the [Transition Icon], select a picture and click on [Apply] to apply this effect.
- Click on the [OK] button and the transition is created. Close all window and text it by using it in between slides as you would any other transition.
Saving the Show
- If you would you like to further use or adapt these 2 examples, save this project under the name “Show 54_Transitions”.Click [File]> [Save As], select the appropriate folder in which you want to save this project, using the explorer and change the [Name] if necessary. Click [Save].


